Have you heard the latest buzz around Microsoft Copilot? No? Well neither have we. It seems like everybody has heard of Copilot but not many people actively use it or even know how to use it. Maybe Microsoft didn’t do the best job rolling out the Copilot feature but either way, we think it can be a pretty powerful tool. In this guide, we’ll explore how to use Copilot in Word to enhance your productivity and improve your documents. Let’s dive in!
What is Microsoft Copilot?

Before we delve into how to use Copilot in Word, let’s briefly discuss what it is. Microsoft Copilot is an AI assistant built into Microsoft 365 applications, including Word. It understands natural language commands, helping you write, edit, and design documents more effectively. Think of it as a smart collaborator that can assist you in overcoming writer’s block, refining your content, and handling formatting tasks.
Learn more about Copilot here: https://adoption.microsoft.com/en-us/copilot/
Copilot can be used across your office apps, notably PowerPoint and Excel. But those guides will come in the future! For now let’s focus on how to use Copilot in Word.
How to Activate Copilot in Word
To start using Copilot, ensure you have the latest version of Microsoft Word and an active Microsoft 365 subscription.
You may need to purchase Copilot. It all depends on your current Microsoft subscription. If you are using Microsoft Word via your company/workplace, it is likely you will already have Copilot as part of your Office 365 subscription.
If you’re using Microsoft Word via your own personal Office subscription then you will need to purchase Microsoft Copilot as an add-on to your subscription. It is priced at around $30/month (updated August 2025) on top of your current subscription.
You can purchase Copilot here.
Once you have your subscription active you will need to know how to access Copilot in Word. Follow these steps.
- Open Microsoft Word: Launch the application as you normally would.
- Sign In: Make sure you’re signed in with your Microsoft account.
- Access Copilot: Here you have a few options:
- You can look for the Copilot icon on the right sidebar. If it’s not visible, you may need to update Word or enable Copilot in your settings. Click the Copilot icon to open the chat side panel on the right hand side where you can type your commands.
- You can hit command ⌘+ \. On PC the shortcut is Alt + i. This generates a Copilot editing window
- You can also click the Copilot icon that you see in the document. This also generates the Copilot editing window
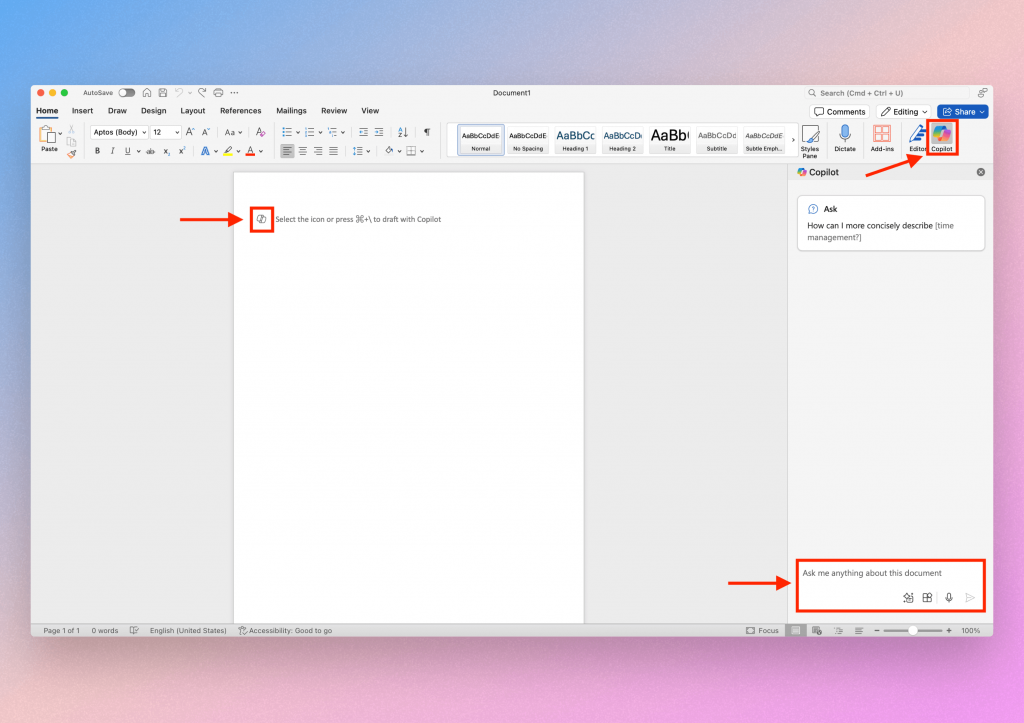
For writing content we prefer to use the keyboard shortcut to produce the Copilot editing window because it feels more integrated to the document.
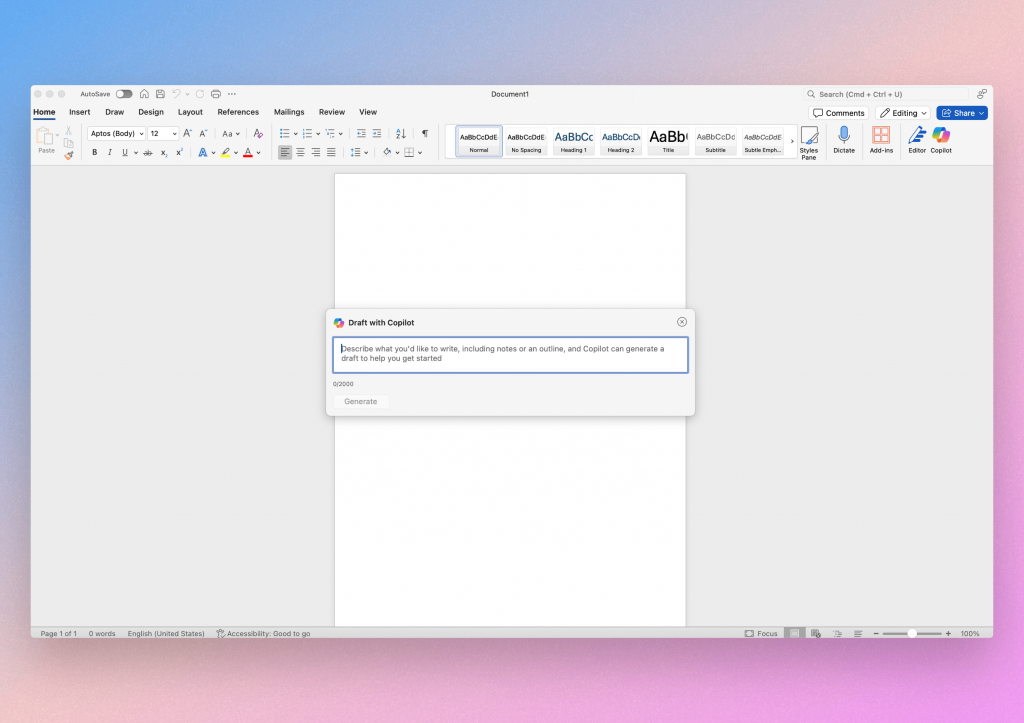
It looks like this:
But now, we will explore how to use Copilot in Word. Specifically, we will look at:
- Using Copilot to Create Templates
- Using Copilot to Create Content
- Using Copilot to Edit Content
- Using Copilot to Create Tables
- Using Copilot to Analyze Content
Okay. Let’s do this.
Using Copilot to Create Templates
Creating templates can be a huge time-saver, especially if you frequently work with similar document formats. Copilot can help you set up professional-looking templates tailored to your specific needs.
How to Create a Template with Copilot
Suppose you need a template for project proposals. Here’s how to use Copilot in Word to create one:
Step 1: Activate Copilot
Open a word document. Click the copilot symbol or use the keyboard shortcuts we discussed in the introduction. This will activate the copilot editor. For this example, we have used the keyboard shortcuts to reveal the document chat box.
Step 2: Provide a clear command
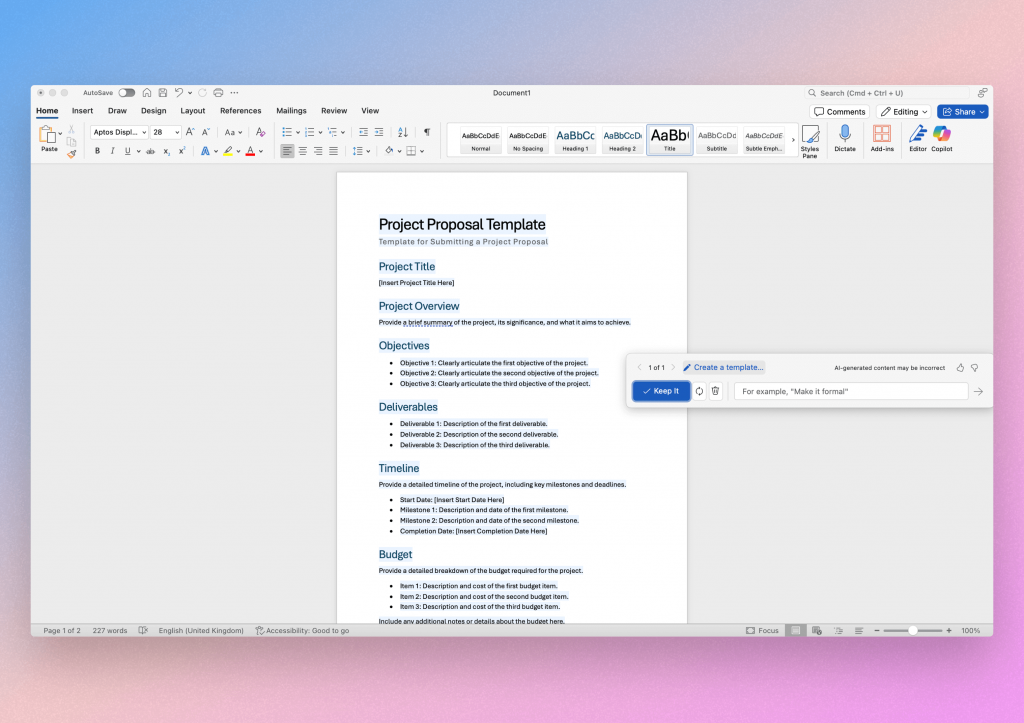
Now we have our Copilot editor open you can input a text command. Type, “Create a template for a project proposal with sections for objectives, deliverables, timeline, and budget.”
Click “Generate” to produce the template.
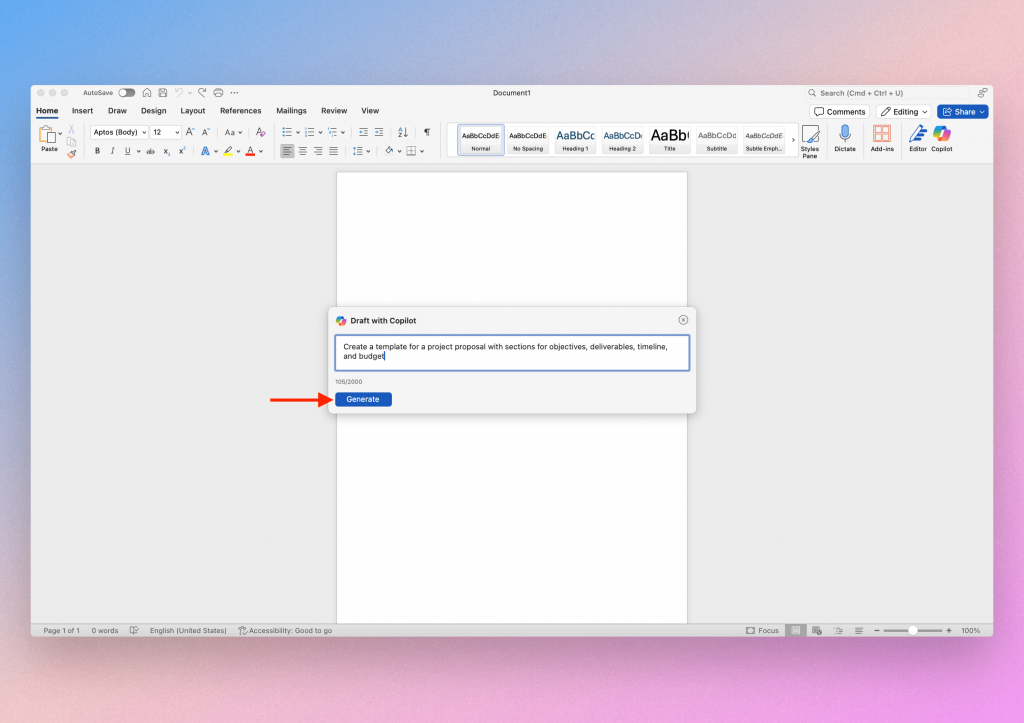
You can add whatever template design works for you. I will say that copilot isn’t extremely advanced so there will be a limit to the templates it can provide. I’d stick with a text heavy template for now.
Step 3: Customize your template
You can implement your own color scheme and set the headings in certain fonts. You can try Copilot for this but the results are a little hit and miss so we recommend doing it manually.
Here is the result we got from the prompt- what do you think?
Step 4: Save the template
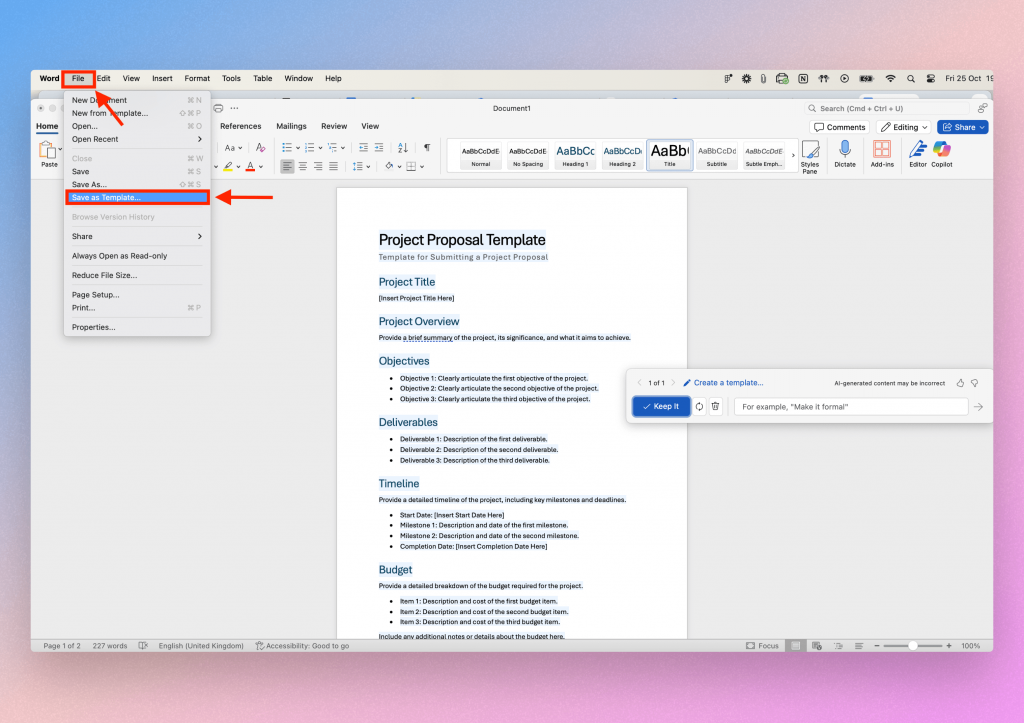
- Go to File > Save As > Word Template.
- Name your template and save it for future use.
Tips based on our experience
- Be Specific: The more details you provide, the better Copilot can tailor the template.
- Iterate as Needed: Feel free to ask Copilot to make adjustments until it’s just right.
Using Copilot to Create Content
Facing a blank page can be daunting. Copilot can help you generate content, making the writing process more fluid and less stressful.
Steps to generate content
Let’s say you’re writing a blog post about the benefits of remote work. We have two ways to create content. This section will cover both so you’ll get a complete understanding of how to use Copilot in Word to generate content:
Option 1
Step 1: Activate Copilot
Open a word document. Use the keyboard shortcuts we discussed in the introduction (⌘ + \ or Alt + i). This will activate the copilot editor box which will sit in your document. You can move the box around easily by clicking anywhere at the top and dragging it with your cursor
Step 2: Provide a prompt
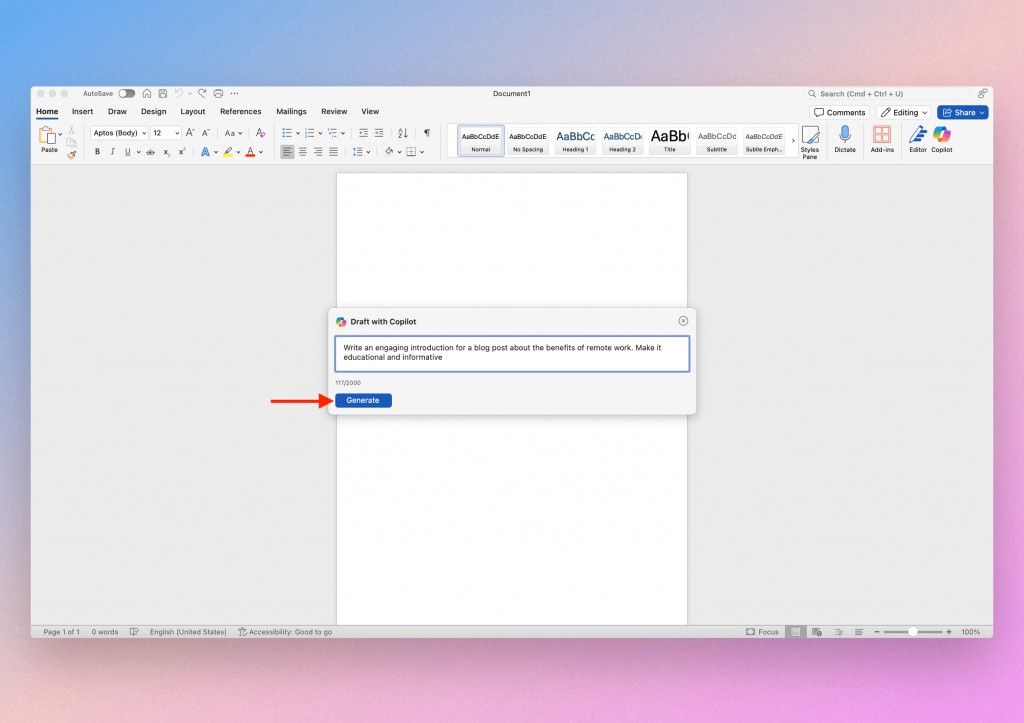
Your prompt can be anything. For this example we will type, “Write an engaging introduction for a blog post about the benefits of remote work.”
Your prompt can be anything you like but we recommend keeping the prompt to 2 lines maximum.
Step 3: Add details
Specify your Tone and Style: For example, “Make it educational and informative.”
Once you’re happy click “Generate”.
Step 4: Check the content
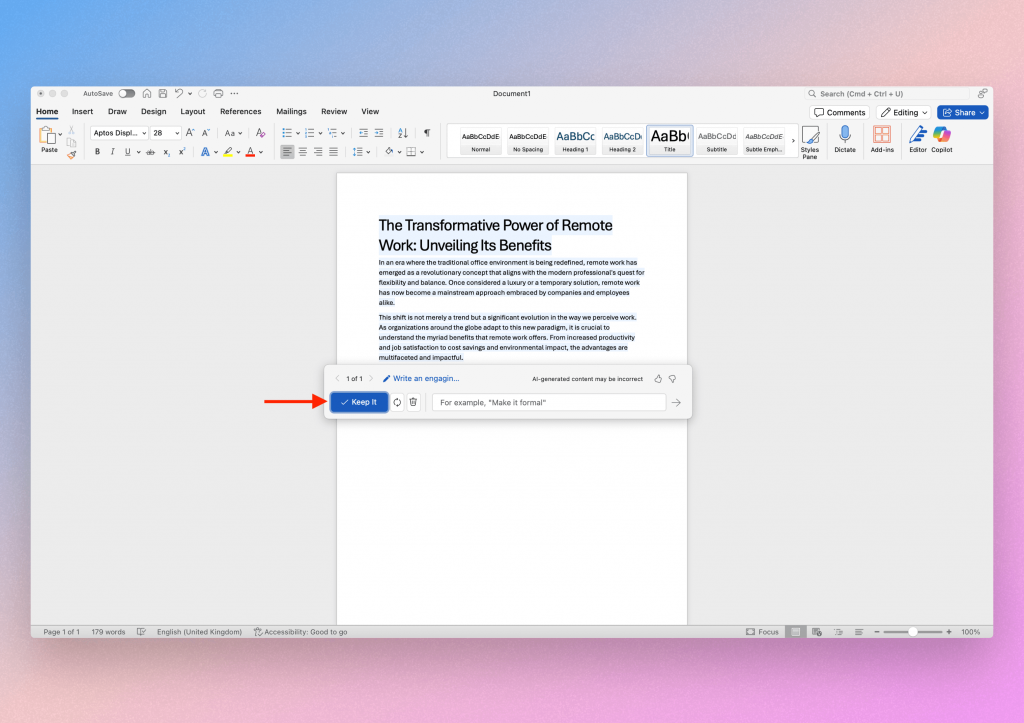
Copilot will generate the text and automatically insert it into your document with a highlight so you know this is new text. You can then decide if you want to keep the content, if so, simply select the “Keep it” button.
We recommend checking the text for flow and style. You can provide Copilot with another prompt to improve the output if you’re not satisfied.
Option 2
Step 1: Activate Copilot
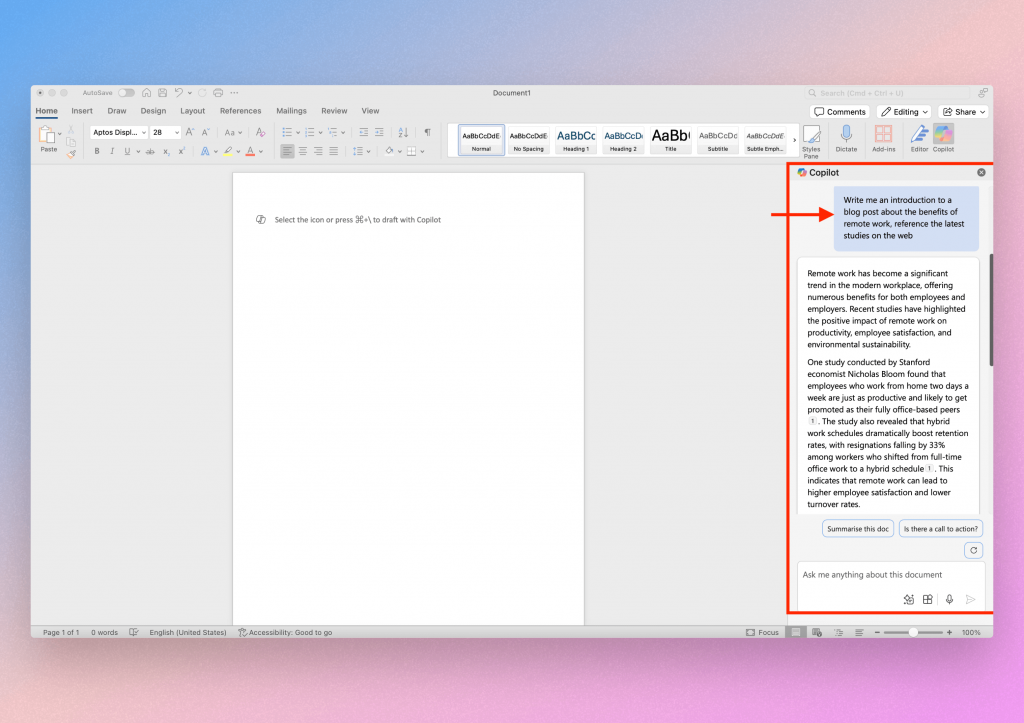
Open the Copilot side panel by clicking the Copilot icon in the top right of the window. You can edit the width of the side panel by clicking the left side of the panel and adjusting the width as you see fit.
Step 2: Prompt Copilot
This method is great because we can now reference the web and include sources for our blog post readers. The prompt has to mention that Copilot should browse the web.
We chose the prompt “Write me an introduction to a blog post about the benefits of remote work, reference the latest studies on the web”.
A simple but effective prompt will give Copilot clear instructions to browse the web. If you make the prompt to complex/long then Copilot may get confused.
Step 3: Check your content and sources
Copilot will produce the copy underneath your prompt and you can browse through it. Check for things like tone and flow because if they’re not up to your standards, we can adjust the prompt to include them.
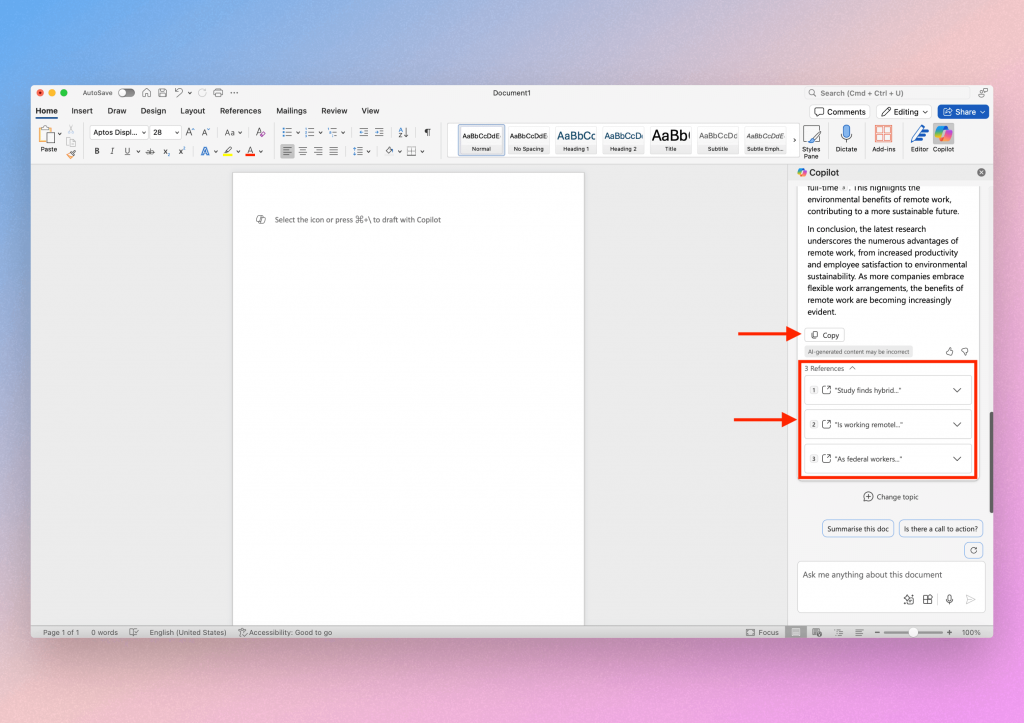
You will also see a list of all the sources Copilot used which is really cool. We recommend checkining out these sources by clicking on the links provided. It could be worth referencing the sources in your blog post so having the links to hand is very useful.
Once you’re happy, simply click the “Copy” button and paste the content into your word document.
You’re ready to go!
Tips based on our experience
- Use Copilot for Brainstorming: Copilot isn’t just for blog posts, it can be a good starter for content ideas or structure. With this blog post example, if you’re stuck, you can ask, “What are some key points about remote work I can include?” This might create a few ideas for you and allow you to write freely.
Using Copilot to Improve Content
Editing is crucial for producing polished documents. Copilot can streamline this process by providing immediate suggestions and corrections. The main benefit here is the time saving element. Gone are the days where you spend half a day proof reading a document before it goes out the door.
We love using Copilot to save time, specifically when producing content!
Steps to improve content
If you have a draft that needs refining, here’s how to use Copilot in Word for editing:
Step 1: Select the text
This assumes you already have some content in your document. If not, head back to Step 2 to create some.
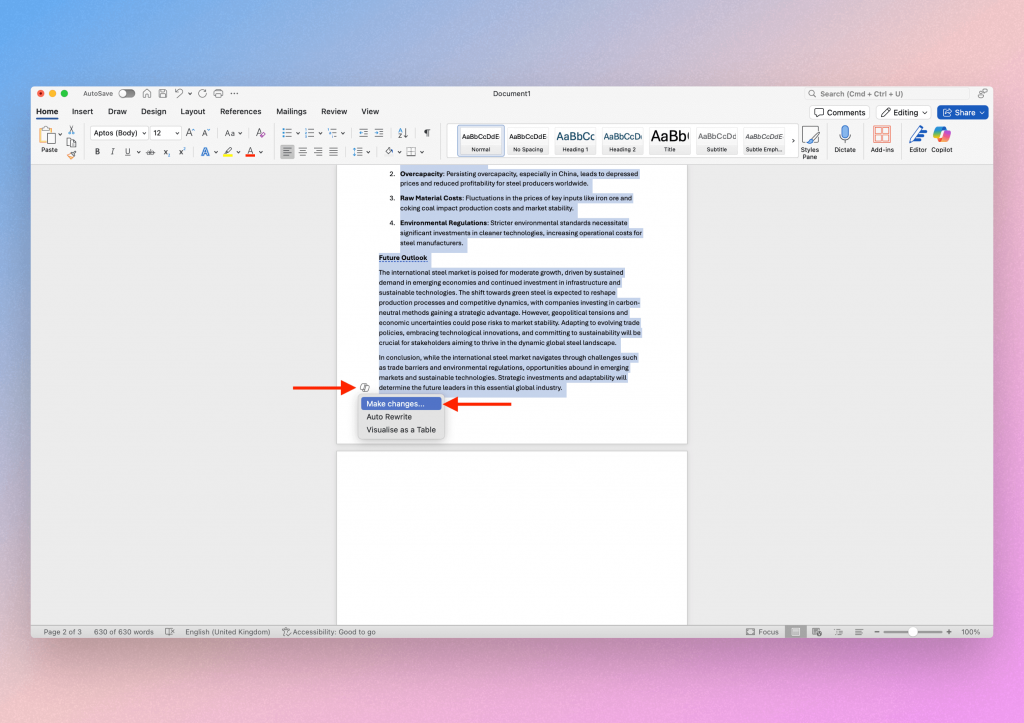
Once you have your content, highlight the text you wish to improve by clicking the cursor icon and dragging it over the text you wish to highlight.
Step 2: Select the Copilot icon
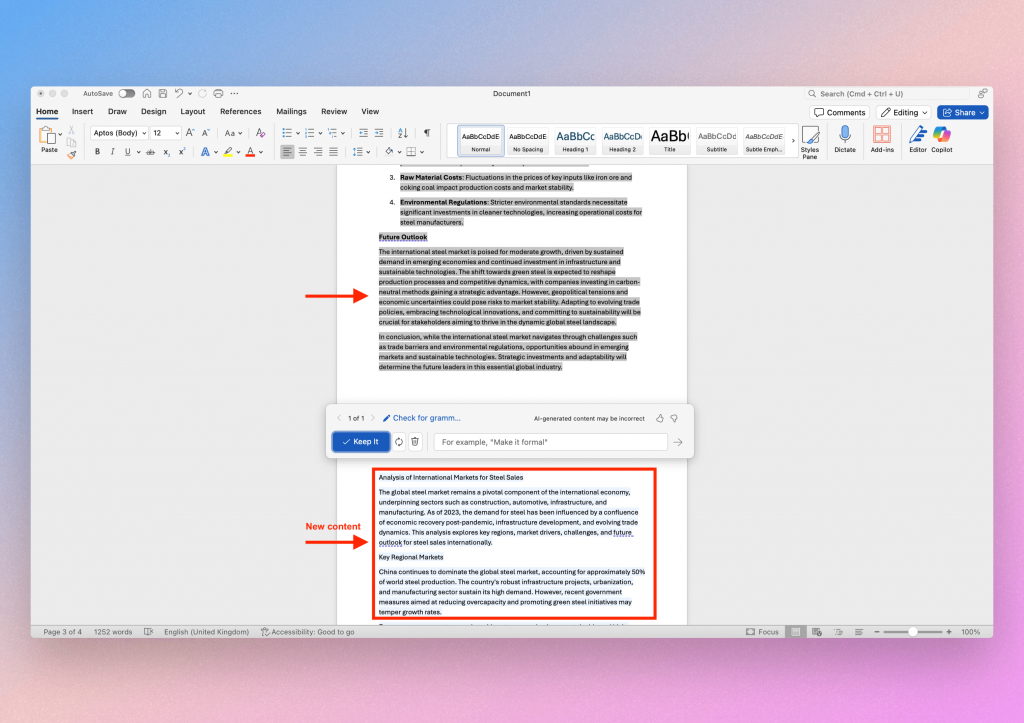
You will see a small Copilot icon next to the highlighted text. If you select that you will see the available prompt of “Make changes”. This will reveal the Copilot box.
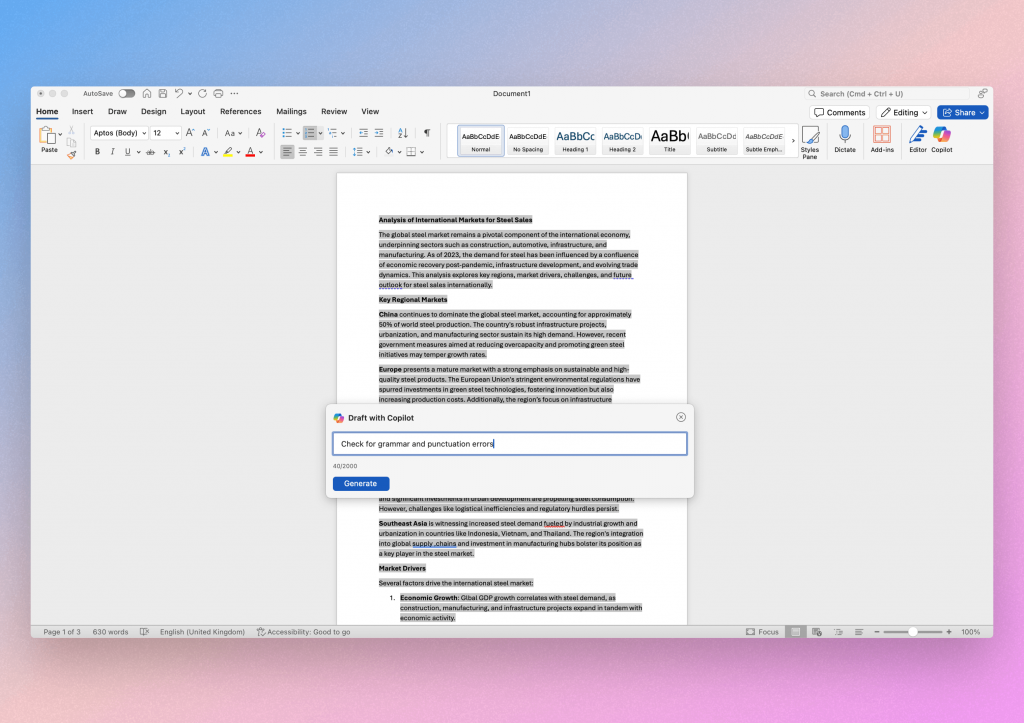
Step 3: Type in your prompt
In this example we will ask Copilot to check for some errors by using the prompt “Check for grammar and punctuation errors”.
You can use your own prompt which can be to add content or alter the tone etc. This feature is very varied and useful so we recommend trying it out as much as possible.
Step 4: Review your changes
Copilot will provide a new version of the content underneath the current content, which you can accept or modify.
This new version will have modified the content and removed the errors we asked for. So this can be your new master copy moving forward.
You can then decide if you want to keep the content, simply select the “Keep it” button.
Tips based on our experience
- Maintain Your Voice: Ensure the edits still reflect your personal or brand tone.
- Learn from Feedback: Use Copilot’s suggestions to improve your writing skills over time.
Using Copilot to Create Tables
Tables make data clear, organized, and visually engaging, while Copilot adds efficiency, customization, and consistency. This tool can help you create professional tables that match your document’s style with minimal effort.
How to Create a Table with Copilot
There are 2 different ways to create a table in Copilot. We will show you both methods and you can use the one you prefer. The main difference is the element of customization. So here’s how to use Copilot in Word for Table creation:
Method 1: Using Copilot’s side panel editor
Firstly, we will load up the side panel editor of Copilot. We can access the side panel by selecting the Copilot icon in the top right corner.
The Copilot side panel editor is easy for creating elements like tables and is overall a better UI/UX experience.
Type in a straightforward command like “Create a table with 4 columns and 10 rows for data”
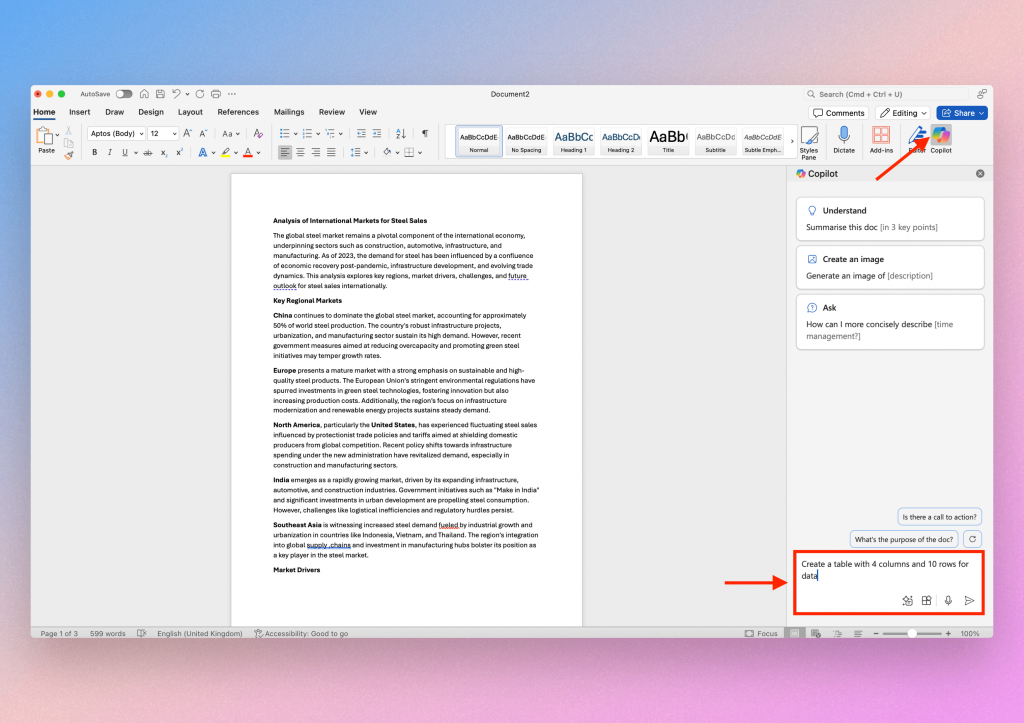
Once Copilot generates your table, you can input your content/data but that is a little manual admittedly.
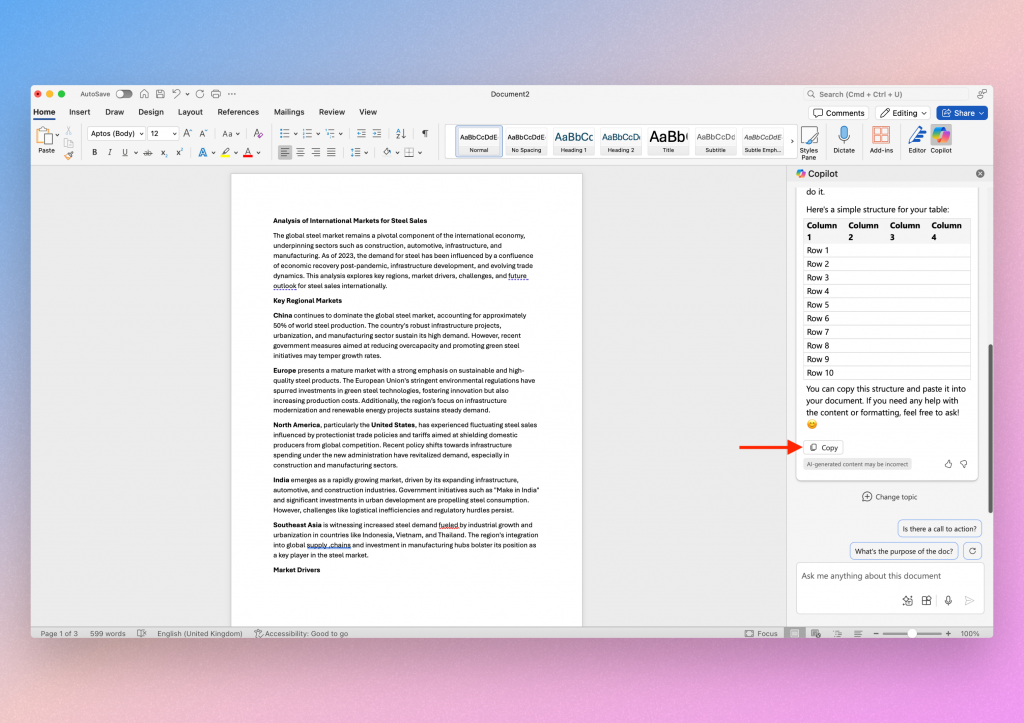
Hit enter and let Copilot work its magic. Copilot will show you the table it has created and you can decide if you want to add it to the document.
Hit the “Copy” button and paste the table into your document, you can then begin to add content easily.
Method 2: Using existing content to build a table
If you already have some content in your document, we can turn that into a table.
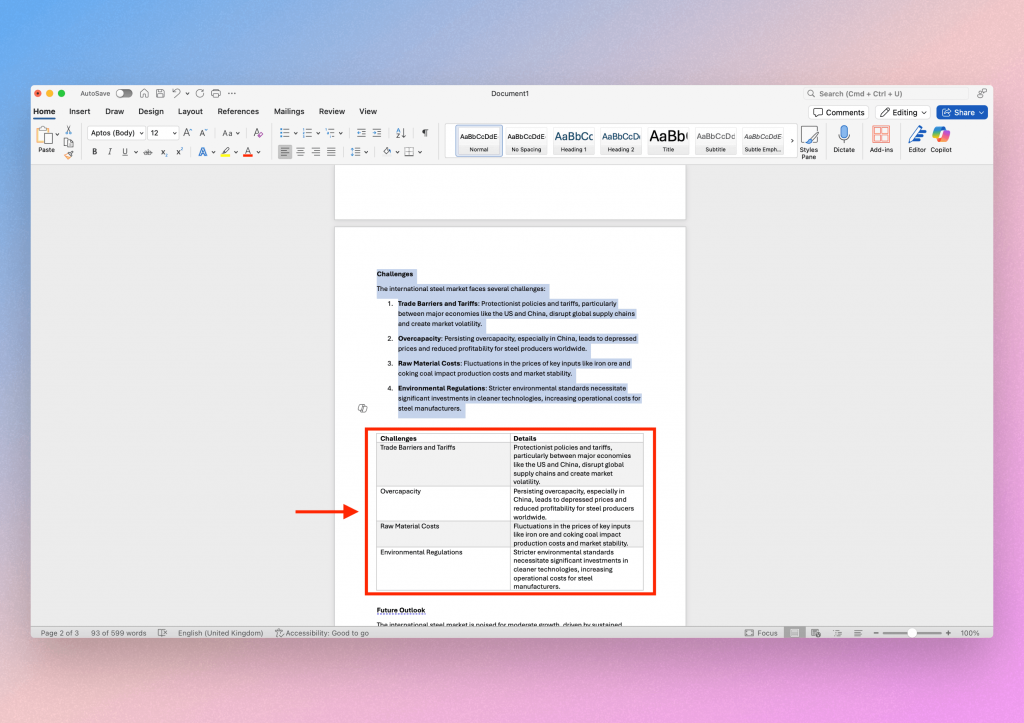
Just highlight the text and can click the Copilot icon next to the text and simply select the “Visualise as a table” prompt.
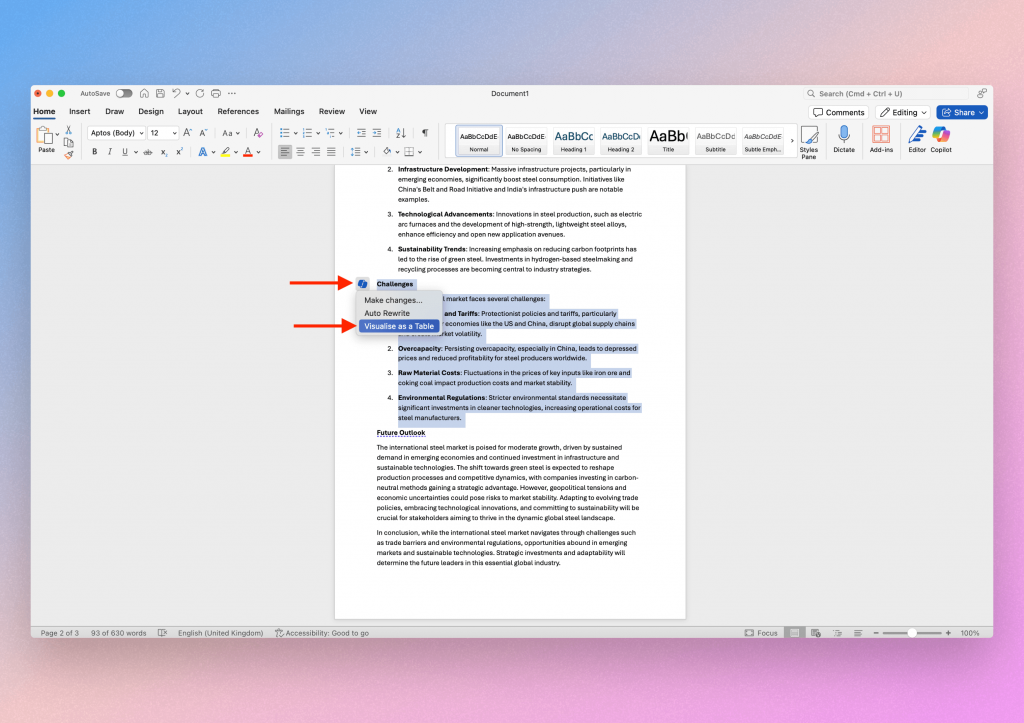
This will automatically create the table which is great, but you won’t have lots of customization with colours or fonts etc but you can always add them in manually after.
We think it looks pretty good considering it took us 2 seconds…
Tips based on our experience
- Keep It Simple: For large datasets, break complex tables into smaller sections for readability.
Using Copilot to Analyze Your Content
Understanding your document is crucial. Maybe your boss sent you a really long brief but you need to get some quick answers for the upcoming meeting. Or maybe you just want to check that your readers can easily get the key information they came for. Copilot can analyze your document to provide valuable insights.
How to analyze your content with Copilot
Analyzing your content ensures it’s clear, engaging, and appropriate for your audience, enhancing its overall effectiveness. There is no point producing content if your audience doesn’t receive the intended message. Here’s how to use Copilot in Word for content analysis:
Step 1: Activate Copilot
Here we are assuming you have your content already in a Word document. Click the copilot symbol or use the keyboard shortcuts we discussed in the introduction. This will activate the Copilot editor. For this example, we have used the keyboard shortcuts to reveal the document chat box.
Step 2: Insert the prompt
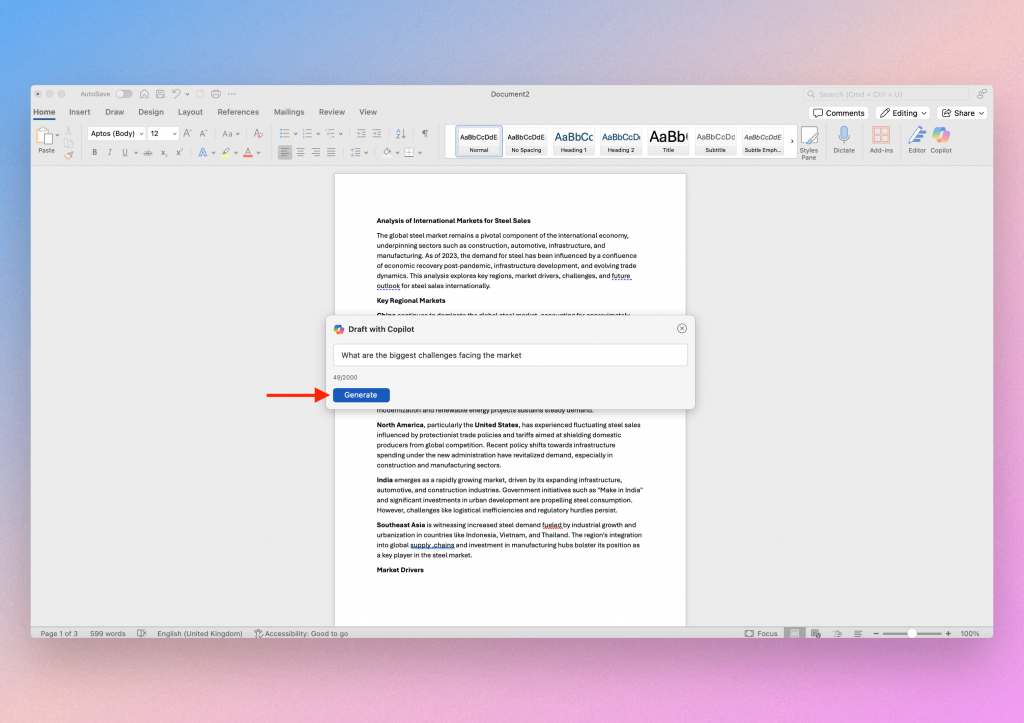
In this example, we want to make sure we have included enough information on the challenges facing the global steel market. Plus, we want to check if the content reads well and can be easily understood.
We insert the prompt “What are the biggest challenges facing the market” into the Copilot editor box.
Step 3: Review the response
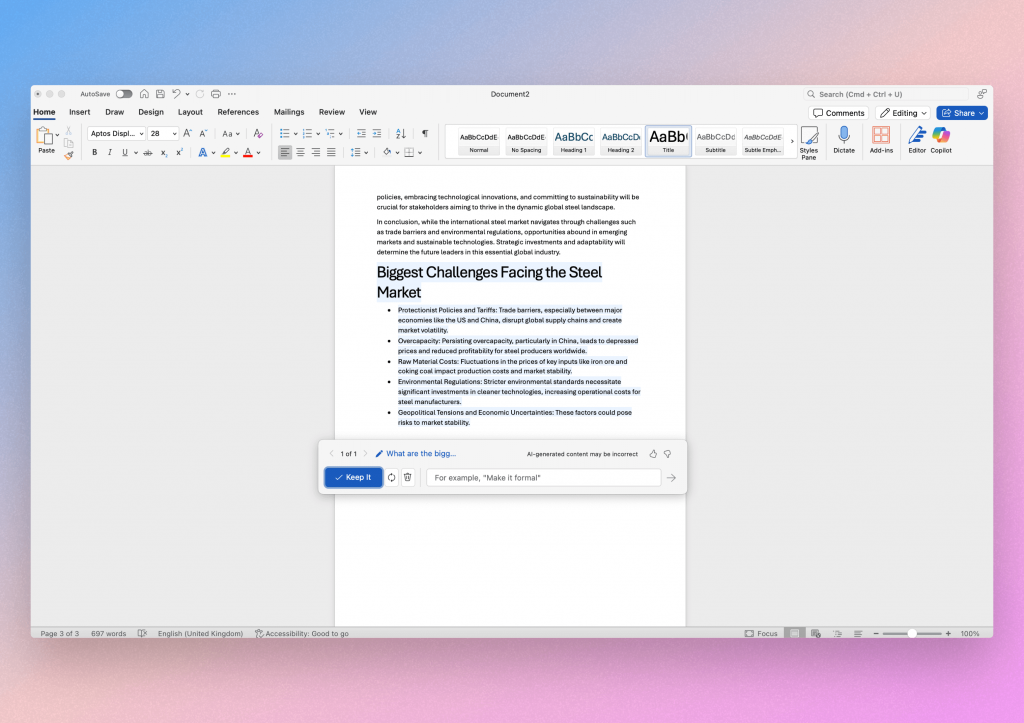
Copilot will paste the information into your document with a different highlighted colour so you know that this a new piece of content. This distinction is important to remember as you don’t want to get confused and have duplicates.
Now we can read through this section and determine if a reader will gain some valuable information from this.
To confirm we are happy with the content, just select “Keep it” and it will be officially inserted into your document. Perhaps you don’t need to insert it if you are just checking the readability or information etc. Either way, give it a quick proof read and make your decision on what to do next!
Tips based on our experience
- Iterate for Improvement: If you do decide to make changes, then keep analysing the content. This will allow you to see how your document has improved.
Conclusion
Learning how to use Copilot in Word can significantly elevate your document creation process. From crafting customized templates and generating engaging content to refining your writing and analyzing its effectiveness, Copilot serves as a versatile tool in your Word toolkit.
By integrating Copilot into your workflow, you’ll find that writing and editing become more efficient and enjoyable. So next time you’re working on a document, consider leveraging Copilot’s capabilities to enhance your productivity.
If you prefer the Google Suite to Office365 then check out our post on How to use Google Gemini in Sheets.
Good luck!