

TL;DR
- You can record one slide at a time or the full presentation, preview instantly, trim, re-record, or loop audio using the built-in playback settings available on Windows.
- On Mac? Use the Recording Studio with features like Presenter View, Cameo for video, and blurred backgrounds to keep the focus on your message.
- PowerPoint online user? No problem. Just record externally, upload your audio as MP3 or WAV, and sync it with your slides in seconds.
- Bonus tips? Check your mic, use the default playback options, and always preview, because no one likes a muffled masterpiece.
Recording audio on PowerPoint sounds easy until you actually try doing it across different devices. One moment you’re searching for the “Record” button, the next you’re stuck wondering why your microphone isn’t picking up anything, or why your narration cuts off midway.
Whether you’re a teacher prepping lessons, a professional building a pitch, or a student delivering a project, poor audio or clunky setups can ruin the whole experience. This blog is here to fix that.
We’ll walk you through exactly how to record audio on PowerPoint, across Windows, Mac, and online, step by step. And if you’re looking to save time or polish your presentation faster, we’ve got something smarter for you, too. Let’s make recording audio on Microsoft PowerPoint effortless.
How to Record Audio on PowerPoint: Slide-by-Slide vs Full Presentation?
Want to learn how to record PowerPoint presentation with audio?
Recording audio in PowerPoint doesn’t need to be confusing. Whether you’re adding narration to a single slide or voiceover across your entire deck, follow these clear steps based on what you need.
Want to Add Narration for Just One Slide?
Here’s how you can quickly record audio on a specific slide without affecting the rest of your presentation.
Step 1: Start by opening your PowerPoint file and clicking on the specific slide where you’d like to insert or begin recording your audio narration.

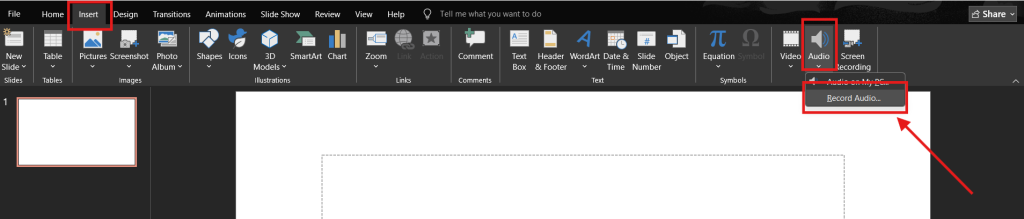
Step 2: To add audio to just one single slide, go to the Insert tab, select Audio. Click Record Audio to start narrating directly on that individual slide.
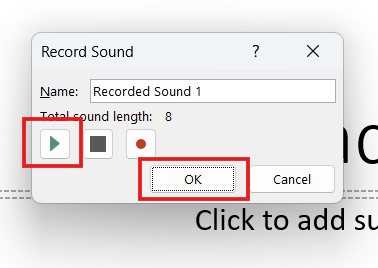
Step 3: In the “Record Sound” dialog box, give the audio a name, and click on the red “Record” button to start recording your audio.

Step 4: After recording, use the Play button to preview each slide’s audio. If something sounds off, you can re-record that slide without affecting the others. Once satisfied with the narration, click OK to save the audio to your slide.
Also Read: The Top 5 PowerPoint Plugins with AI
Looking to Narrate the Entire PowerPoint Presentation?
Follow these steps if you’re recording audio for every slide as part of a seamless, timed presentation.
Step 1: Start by opening your PowerPoint presentation in which you want to record your audio narration.

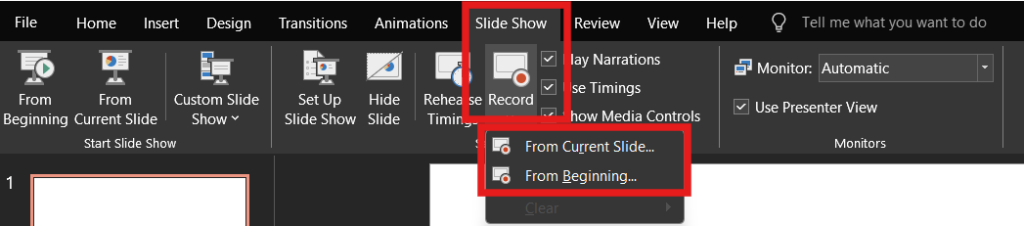
Step 2: After selecting your presentation, go to the Slide Show tab and choose Record, and decide whether to start from the beginning or the current slide.
Step 3: Before recording, ensure your microphone is connected and enabled. Optionally, turn on your webcam if you want to include video narration with your presentation.
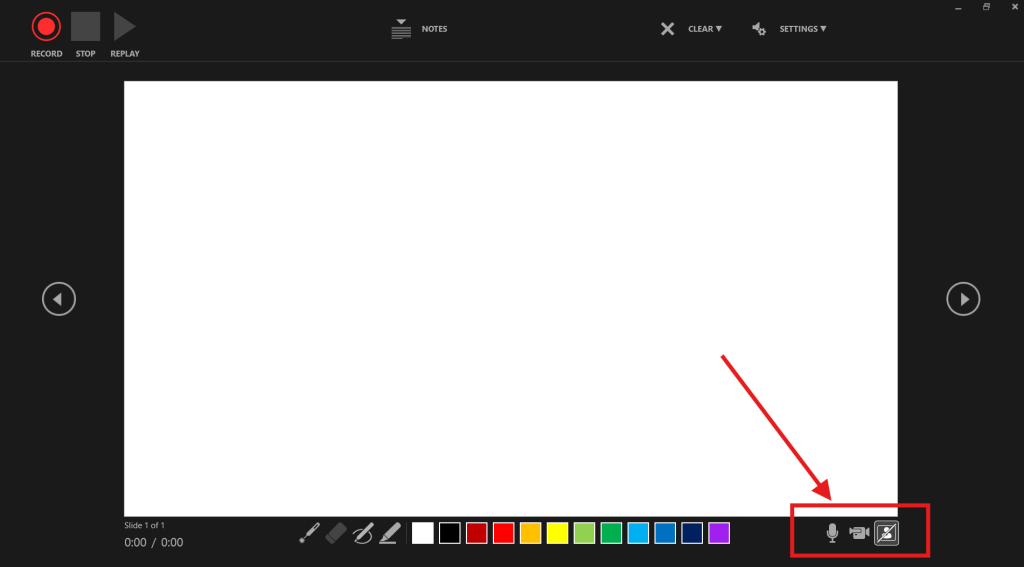
Step 4: Click the Record button to start. A countdown timer will appear. Begin speaking, and use Pause or Stop to control your narration per slide. Use the Replay button to preview your recording.

Also Read: Best Tools to Animate Presentations with AI
How to Record Audio on PowerPoint Mac?
Recording audio in PowerPoint on Mac is perfect for turning your presentation into a video, online course, or training resource. Whether you’re narrating graphs or a linked Excel chart, this guide shows you exactly how to do it. Let’s get started!
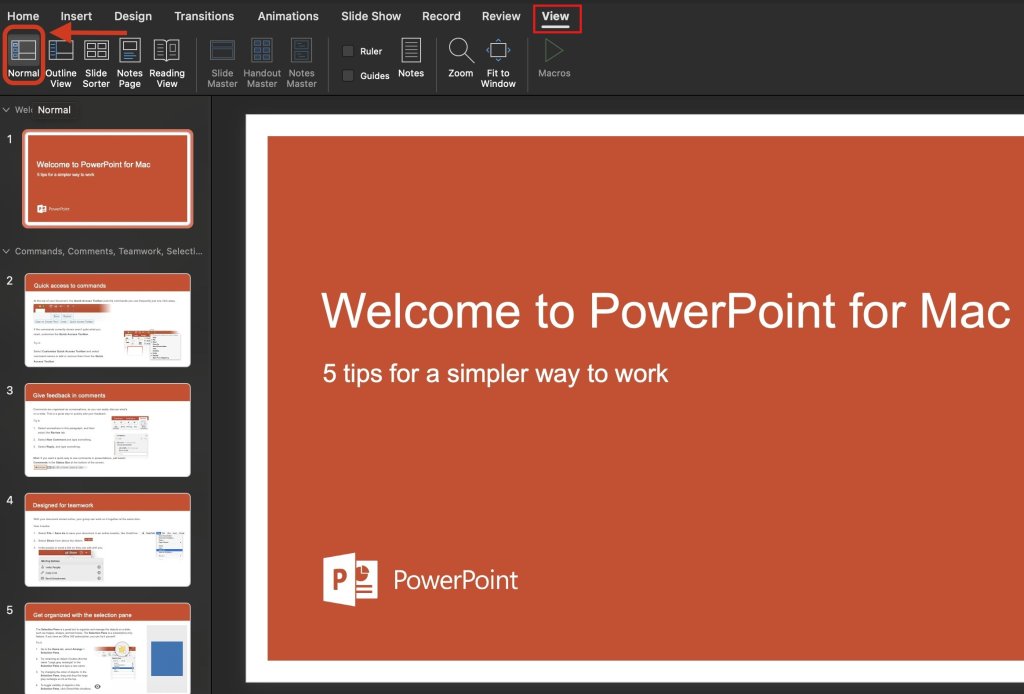
Step 1: Begin by launching your presentation in normal view, View > Normal. Ensure your PowerPoint template, slide master, slide layout, and any elements, like group objects, WordArt, or embedded YouTube clips, are finalized.
Step 2: In the top-right corner, click the Record button, or go to the Record tab and select either:
- From Beginning: To start at slide 1
- From Current Slide: To continue from where you left off

Pro Tip: Select the Cameo feature before launching the Recording Studio.
Go to Record tab > Cameo, then adjust your camera feed’s size, shape, and location using the Camera Format tab. This is great for training videos or content-heavy slides.

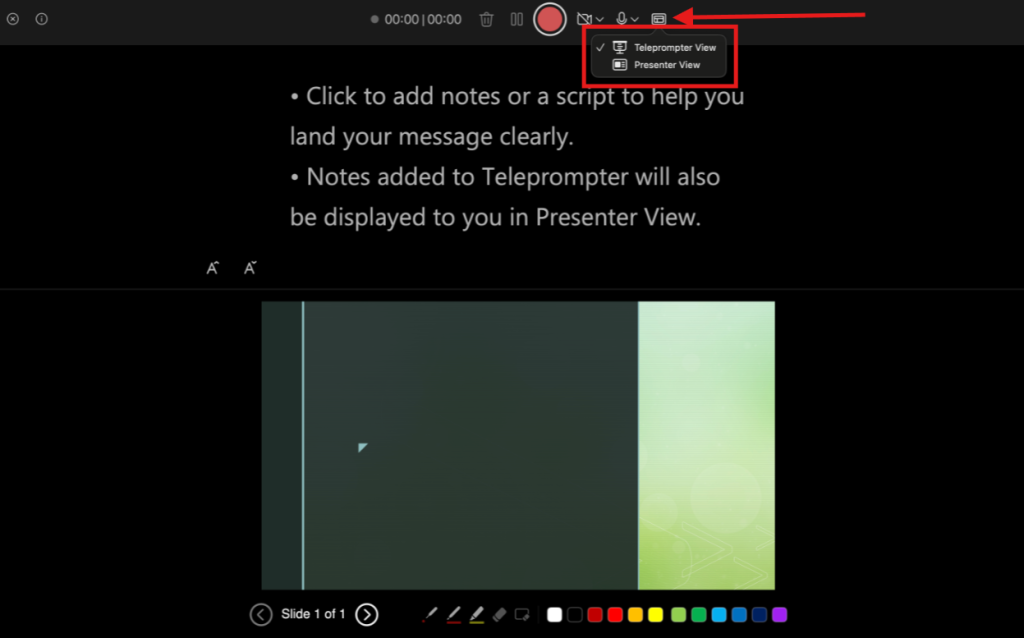
Step 3: Pick from two layout options to stay on track, especially when walking through design ideas, slide numbers, or page orientation changes:
- Teleprompter View: Lets you view your script while looking toward the camera.
- Presenter View: Shows speaker notes, current slide, and next slide.
Step 4: Use the toolbar to toggle your mic and camera. Want just voice? Click the camera icon to turn off video.

Tip: Select Blur Background to keep your focus while hiding distractions, helpful when recording near busy spaces.

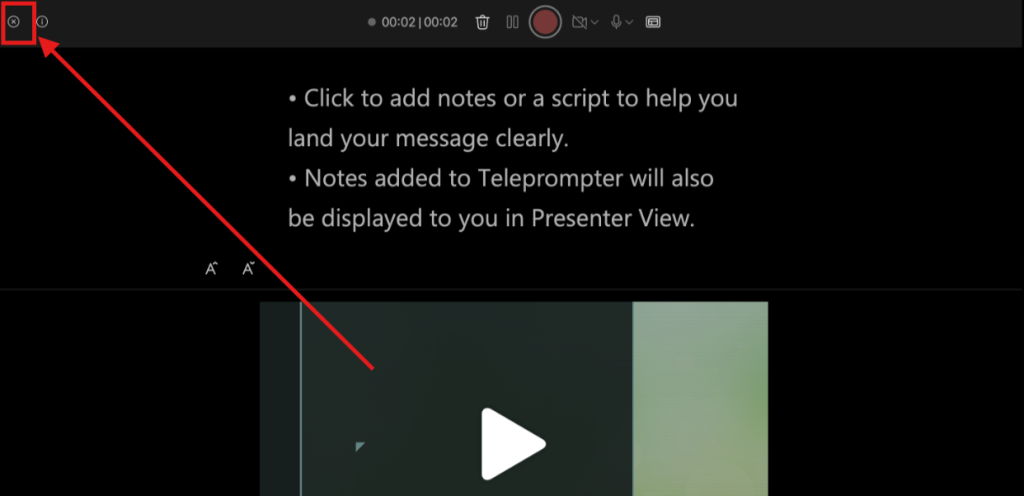
Step 5: Click the Record button. A countdown begins. Narrate your slide, use the laser pointer or pen tool, and click through animations as needed. You can pause or resume your narration at any time.

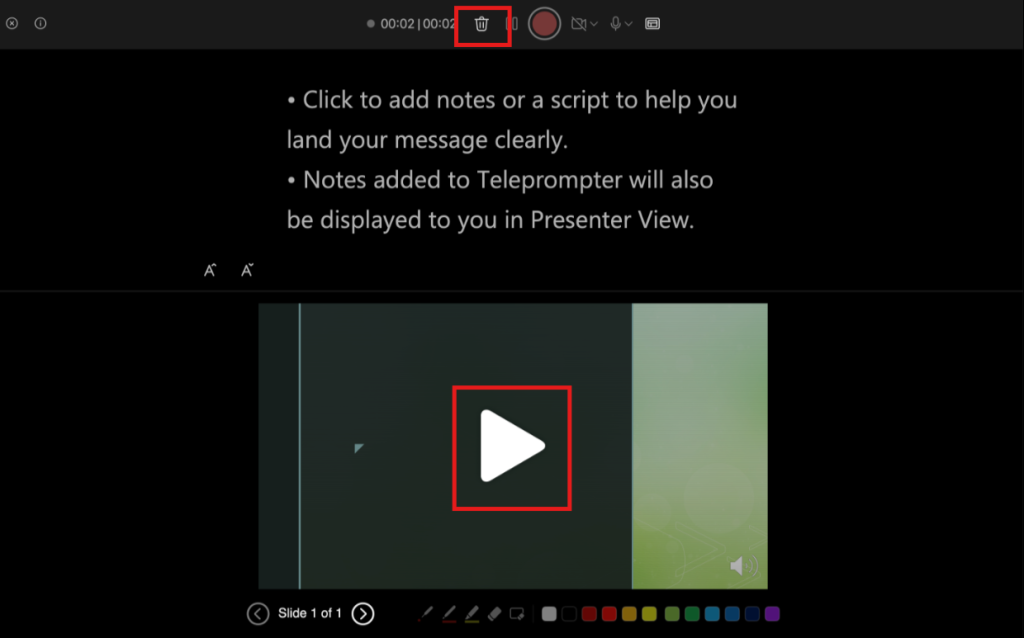
Step 6: Use the Play button to preview your current slide’s recording.
Need to redo it? Click the trash icon next to the record button to delete that slide’s audio or video, then re-record.
Step 7: Exit the recording studio by pressing Esc or selecting the cross in the top left corner of the screen. You’ll return to your slides with audio/video icons and slide timings saved automatically.
Tip: You can adjust the size or position of the audio/video thumbnail afterward in edit view. This helps when aligning with SmartArt, graphs, or custom page numbers.
Step 8: Once satisfied, go to Record > Export as Video. Choose your video quality and whether to use the recorded timings and narrations. This is ideal for sharing lessons, converting into PDF files, or uploading as a presentation to your LMS or YouTube.

Also Read: How to Download Videos from a PowerPoint File
How to Record Audio on PowerPoint Online?
Unfortunately, PowerPoint Online does not support in‑app audio recording or narration functionality. You’ll need to record your audio separately, then insert it into your slides. Here’s how to record audio on PowerPoint online:
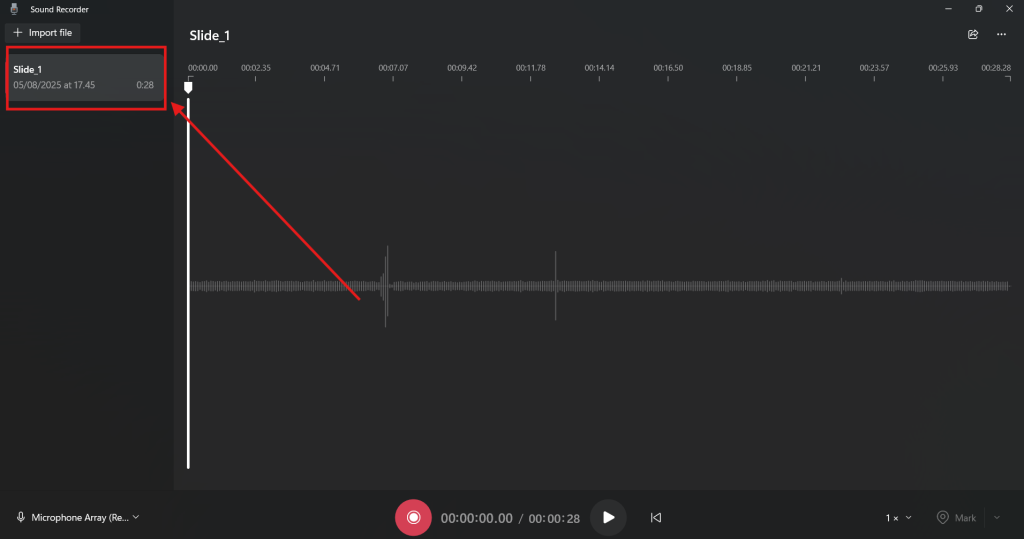
Step 1: Use an external audio recorder or app on your device, such as Sound Recorder (Windows), QuickTime Player (Mac), or any free recording app, to create clear recording files for each slide.
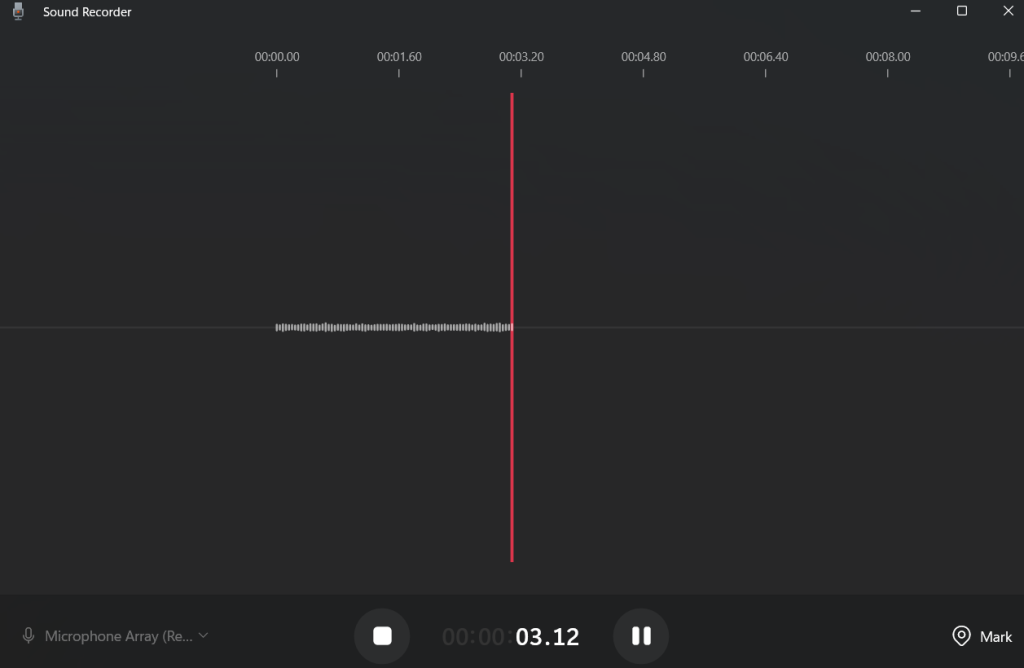
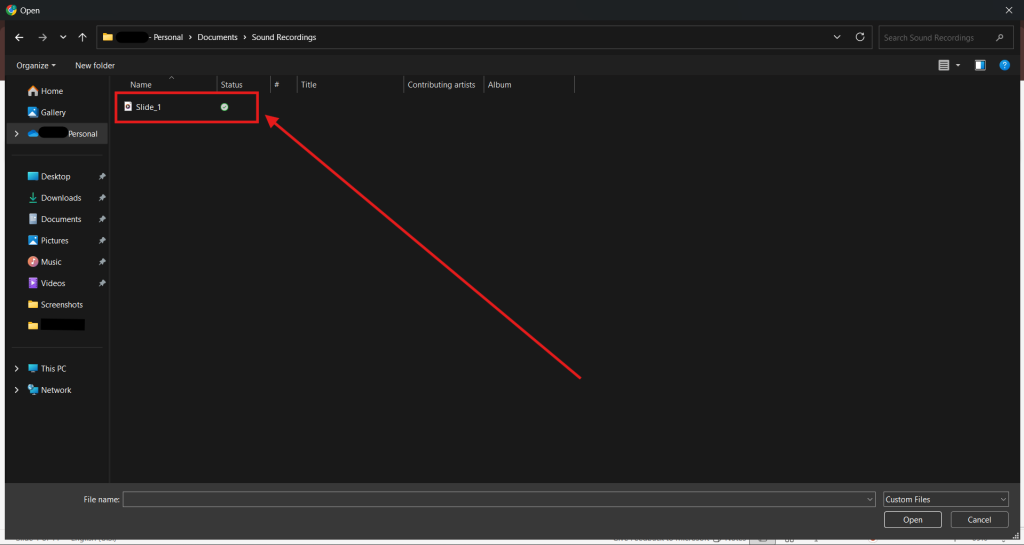
Step 2: Save your recordings as MP3 or WAV files. Name them clearly with slide numbers or titles (e.g., Slide_1) to keep your narration organized.
Step 3: Open your presentation in PowerPoint online and click the Insert tab at the top of the screen. Choose Audio to start embedding narration onto each PowerPoint slide.
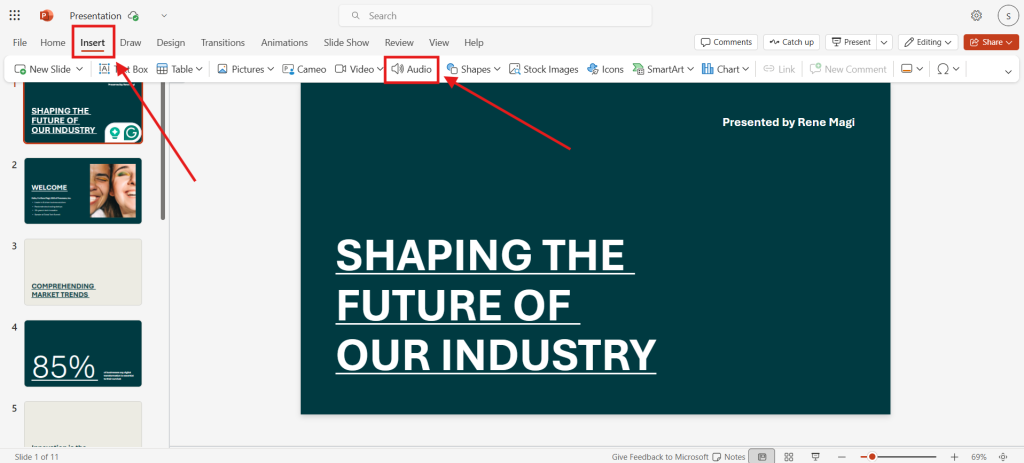
Step 4: Browse and select the correct audio file for the slide.
Step 5: Click the audio icon > Playback tab and use the playback options to preview, loop, or set autoplay. Position the audio icon discreetly or hide it to keep your slides clean.
Also Read: Top 5 Free AI Presentation Makers in 2025
How Can You Make Your Audio Recording Process Smoother in PowerPoint?
Whether you’re creating a training presentation on your PC or preparing handouts with embedded audio, the following tips will help you record smoothly and make post-production edits easier.
1. Record One Slide at a Time
Instead of recording your entire presentation in one go, focus on narrating one slide at a time. This gives you more control when editing or rearranging content later. It is especially useful if you update slide layouts or use grouped objects that may need contextual narration.
2. Preview Your Audio Immediately
After recording, hit the Play button to preview the narration for that specific slide. Listen for clarity and check the volume level to ensure it’s consistent across all slides.
If something sounds off, you can easily re-record that slide without affecting the others.
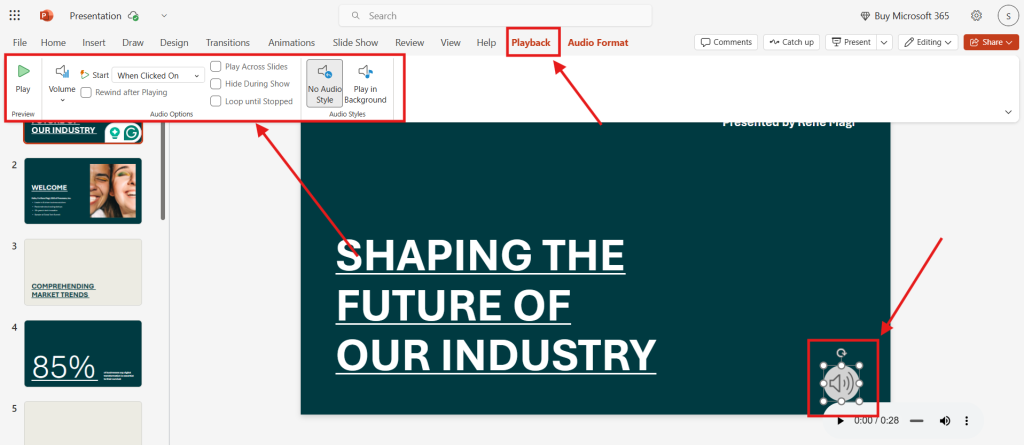
3. Use Playback Options for Fine-Tuning
Go to the Playback tab (visible when an audio icon is selected) to enhance your audio:
- Trim unwanted silence or errors
- Fade in/out for smoother transitions
- Choose whether to start automatically, on click, or loop the narration
These small tweaks help maintain a polished, professional flow throughout your presentation.
4. Manage Recorded Timings and Narrations
Want to control slide transitions manually during playback?
Simply turn off Recorded Timings and Narrations via the Slide Show tab. This is ideal if you’re presenting live or want to skip to certain slides without being tied to the default playback.
5. Save a Backup
Before making changes, duplicate your presentation or save a version with “Audio Draft” in the name. That way, you always have a fallback if something goes wrong.
Also Read: 15 AI Tools to Improve Your PowerPoint Presentation
Final Thoughts
Recording audio in PowerPoint isn’t just about pressing a button; it’s about bringing your ideas to life with clarity, personality, and impact. Whether you’re adding context to graphs, walking through SmartArt, or explaining a linked Excel chart, your voice adds that human touch that text alone can’t deliver.
Now that you’ve mastered the steps, it’s showtime. So go ahead; hit record, own your narrative, and let your presentation do more than just look good; let it talk.
Frequently Asked Questions
How to delete audio recording on PowerPoint?
Click on the speaker icon on the slide, then press Delete or right-click and select Remove. This will delete the audio clip from that slide without affecting the rest of your presentation or any other recorded content.
How to edit audio recording in PowerPoint?
Select the speaker icon, then go to the Playback tab. From there, you can trim the beginning or end, fade audio in or out, adjust volume, or change how the audio starts during the slideshow.
How to insert audio recording into PowerPoint?
Click on the Insert tab, choose Audio, then select Audio on My PC. Pick your desired MP3 or WAV file, and it will be added to the current slide. You can then adjust how and when the audio plays.
How to pause audio recording in PowerPoint?
While recording, you’ll see a toolbar with control buttons. Simply click Pause to stop recording temporarily. This helps when you need a break or want to gather your thoughts before continuing with the next part of your narration.
How to record a PowerPoint presentation with audio on Zoom?
Start a Zoom meeting, open your presentation, and share your screen. Begin the slideshow, then click Record in Zoom. As you present, Zoom will capture both your screen and voice, creating a video of your entire presentation.
What’s the difference between inserting pre-recorded audio and recording audio directly within PowerPoint?
Pre-recorded audio offers more control and quality since it’s usually edited beforehand. Recording directly is faster and more convenient, but editing options are limited and depend entirely on the tools built into the presentation software.
What microphone settings should I check before recording audio on PowerPoint to ensure the best sound quality?
Check that your microphone is properly connected, set as the system’s default input, and positioned well. Adjust input volume, disable any background noise filters, and test your voice level before starting to ensure clarity and consistency.
Can I export a PowerPoint presentation with recorded audio as a video, and will the audio stay in sync?
Yes, you can export your presentation as a video file. The audio narration will stay aligned with your slides, including any animations or transitions, as long as everything was recorded using the presentation’s built-in tools.
How to record audio on Chromebook PowerPoint?
To record audio on Chromebook PowerPoint, use an external app like Chromebook’s built-in Recorder to capture clear narration. Export the audio as MP3 or WAV, then insert it into your PowerPoint slides via Insert > Audio.