Automate reports and presentations with Zapier
Zapier is a fantastic and easy tool for automating workflows, especially for business. If you work with numerous platforms, countless clients or constant data flows, Zapier can help automate those interactions and boost your productivity. This article will show you how to automate reports as presentations with Zapier. We’ll be using Zapier to interact between Google Sheets, Google Slides, Google Drive and more.
First, we’ll explain what Zapier is – but here’s what you can expect to learn about automating reports and presentations:
- How to automate reports as presentations and store them in Google Drive with Zapier
- Example 1: Use Google Slides to automate reports with Zapier
- Example 2: Use SlideSpeak AI to automate PowerPoint reports with Zapier
What is Zapier?
Zapier is a website that allows various apps and platforms to work together by connecting them in one place. You can integrate everything from Google Drive to Microsoft Office, Facebook, LinkedIn, ChatGPT and more. Then, you can automate interactions between each app in various ways.
Zapier operates by creating workflows called “Zaps”, which trigger events and actions between apps. For example, adding leads to email lists or turning reports into presentations automatically.
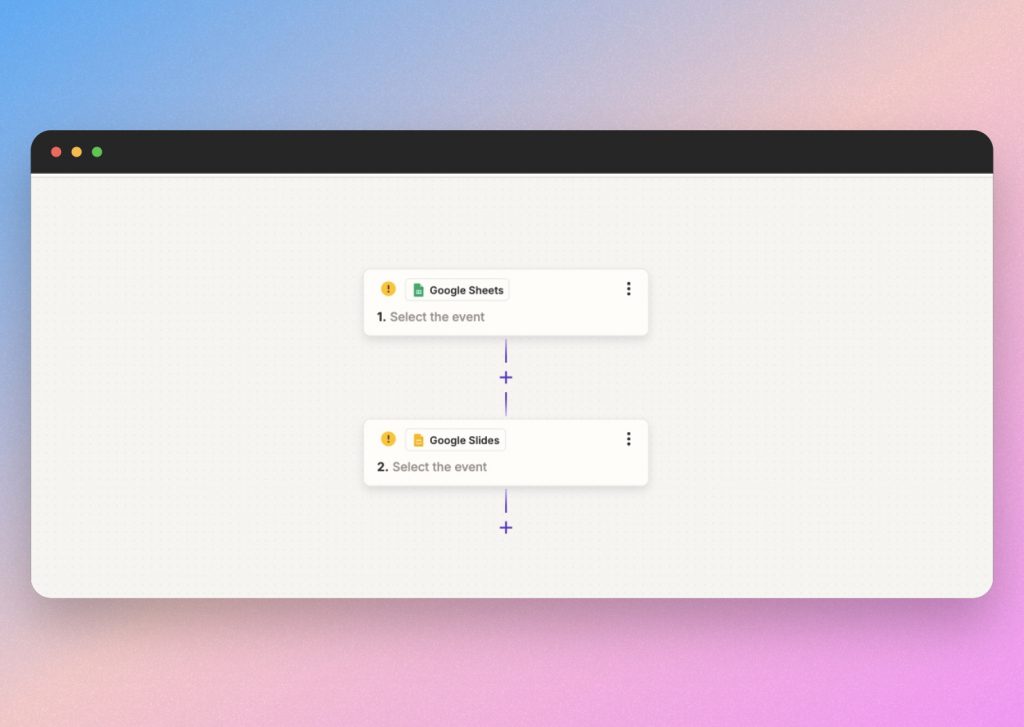
- Ex: Report → Presentation ; → Presentation → Google Drive
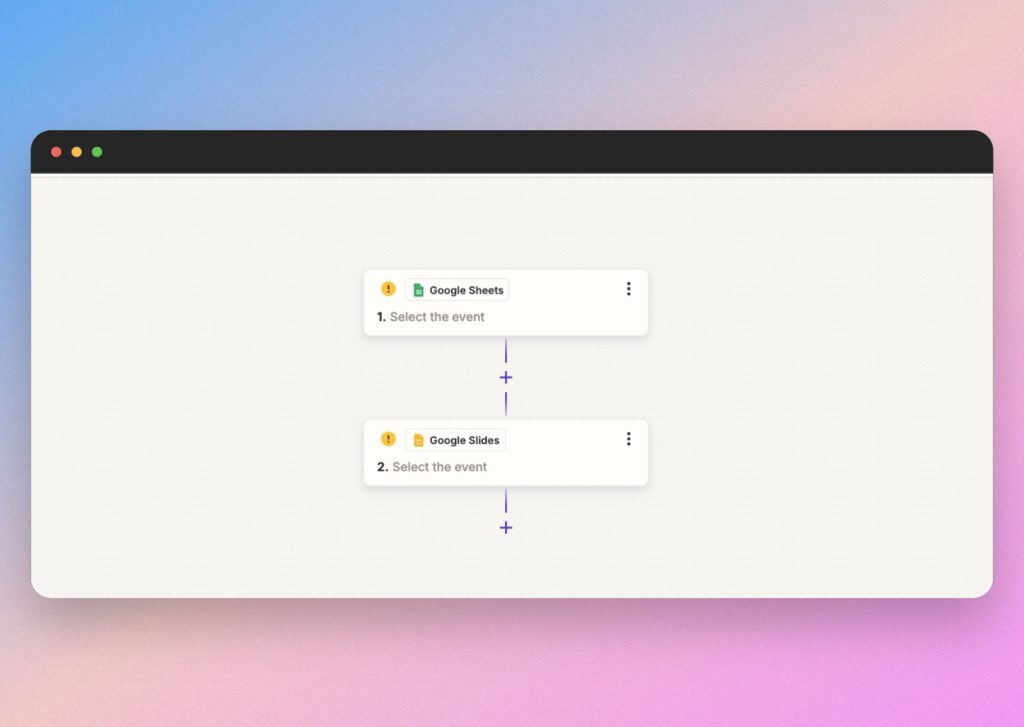
- Helpful hint: A “Zap” is basically a workflow. So, when you create a Zap in Zapier, know that you’re essentially referencing an interaction between two or more apps.
For example, let’s say you want to turn a weekly data report into a presentation each time it’s updated. Instead of doing that manually, you can set up a Zap to automate the process.
From Zapier’s website, you can set up “if — then” automations that trigger events across multiple platforms without needing technical knowledge. For instance: If a new row is added to Google Sheets, then a new presentation will be created from a template in Google Slides.
Where can I find Zapier?
The best part? It doesn’t require any coding. Zapier is an integrative website, meaning you don’t need to install any software and you can search for it on any browser.
Depending on which Zapier plan you opt for, the chain of events can be essentially limitless. You can automate almost any kind of workflow between any app or platform.
It’s worth noting that Zapier offers offers a free plan with limited Zaps, as well as paid plans for individual or team use. You can try Zapier for free or subscribe to paid plans for more intricate use, find the best option for you here.
In this article, we’ll explore 2 ways to automate reports and turn them into presentations with Google Drive and Zapier. Each option only requires a small amount of setup.
Let’s start with our first example using Google applications.
Automate reports, presentations and Google Drive with Zapier
Our first example shows how Zapier can automate reports from Google Sheets and turn them into presentations on Google Slides, then save them to Google Drive in 1 step. Although it does require some preparation at the first, Zapier will be able to automate this workflow.
Example 1: Turn reports from Google Sheets into presentations on Google Slides with Zapier
The steps needed in this process are as follows:
- Prepare a presentation template in Google Slides
- Create 2 Zaps in Zapier
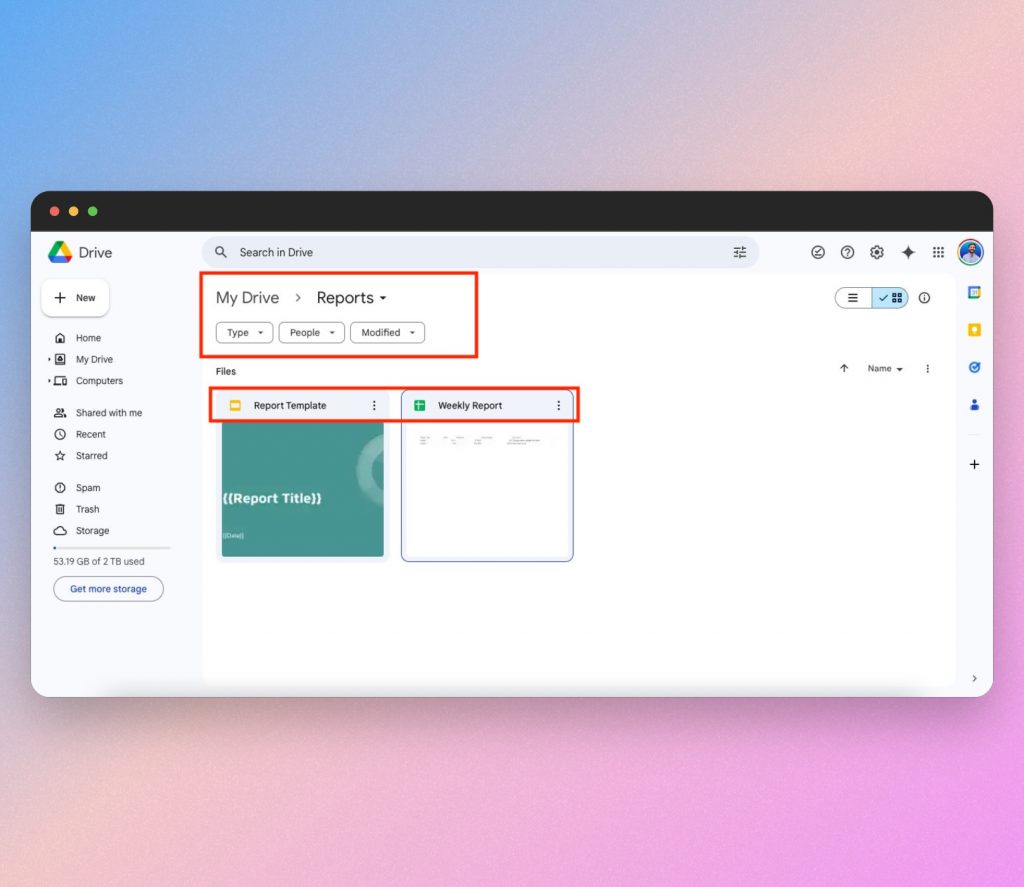
Presentation Template
Before we create our first Zap, it’s important to build a presentation template in Google Slides for future automated reports.
If you want to generate presentations out of regular events like weekly, monthly or yearly reports, the first step would be to create a sample presentation that outlines the information you typically receive in the report. You can design it however you’d like, but make sure the text boxes correlate to cells in the spreadsheet as depicted below.
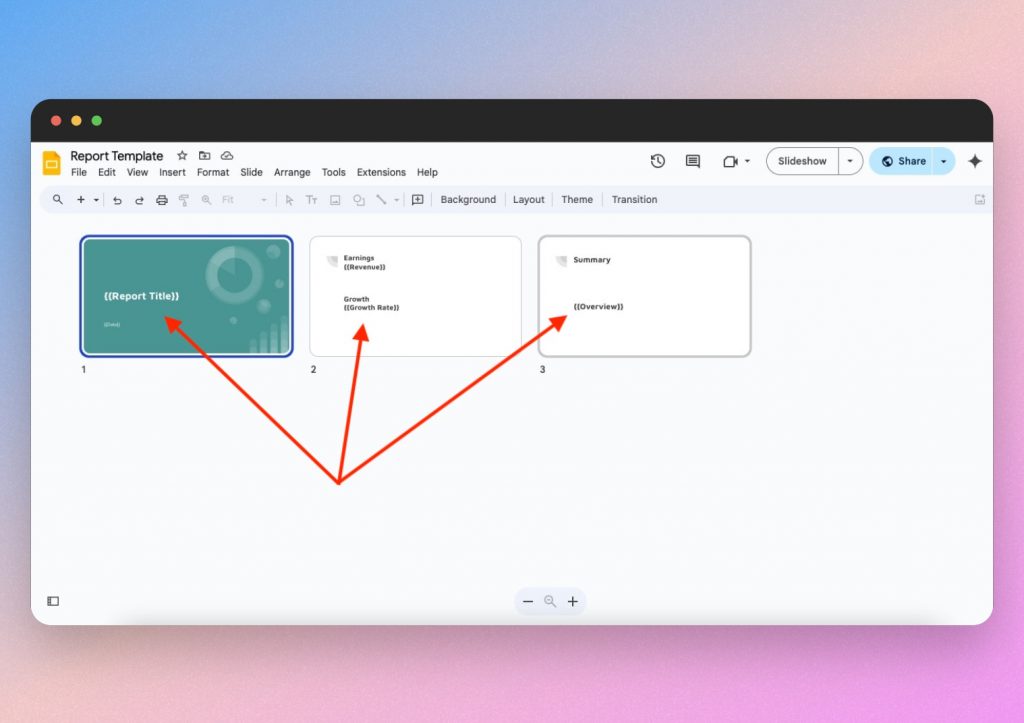
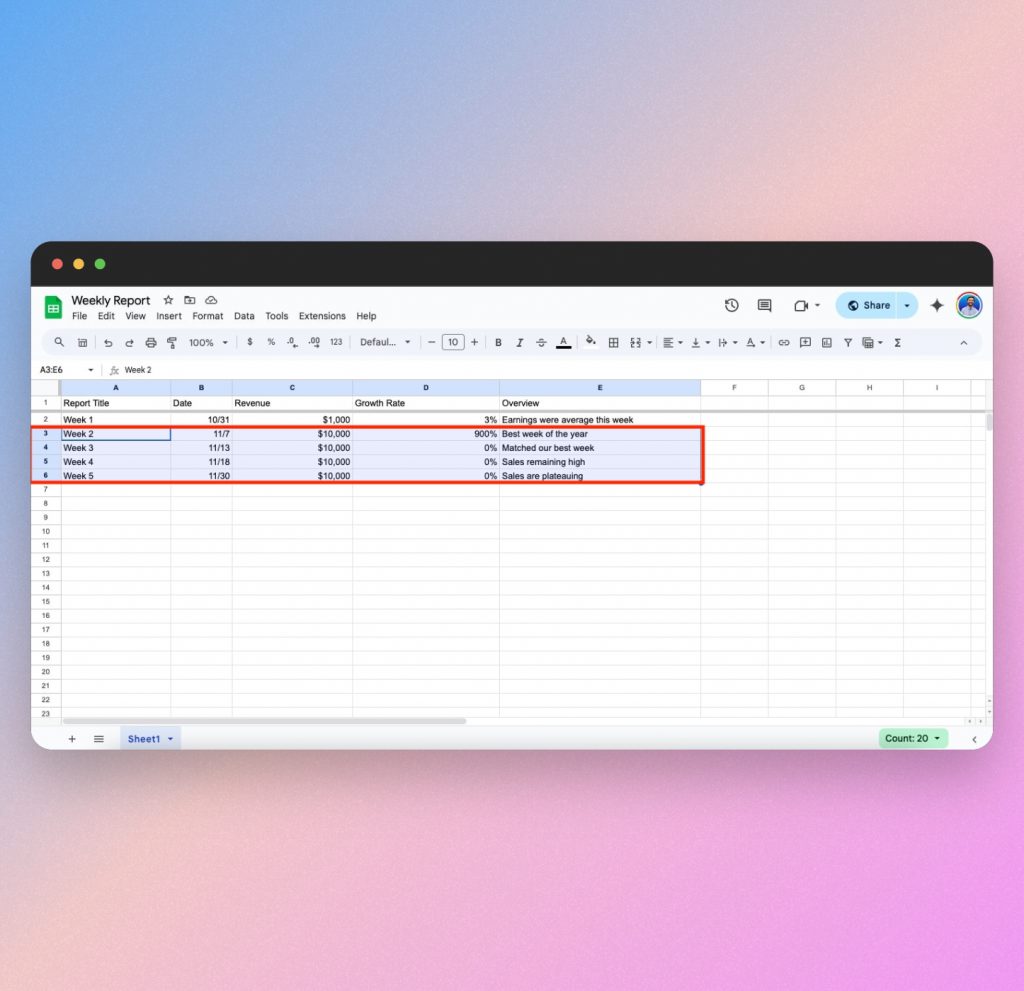
Set up the template in Google Slides by typing {{placeholder}} words with double-curly brackets in the text boxes. For example, the placeholder words in my presentation template match the cells in my Weekly Report spreadsheet.
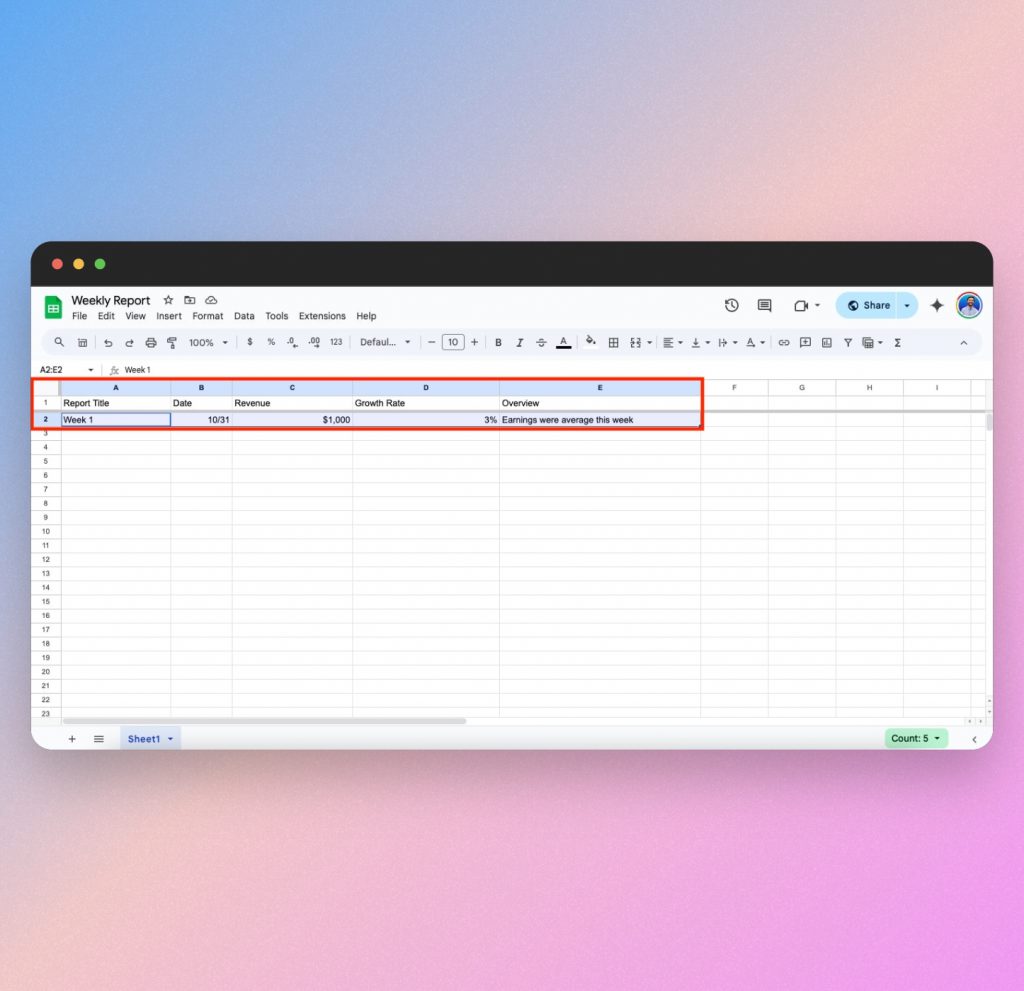
In this scenario, we’re receiving reports labeled “Revenue”, “Growth Rate” and “Overview”, so we’ll go ahead and match those words in our template slides as follows: {{Revenue}}, {{Growth Rate}} and {{Overview}}. Doing this will ensure the information from Google Sheets gets translated into Google Slides correctly.
Once you’ve made your template, Zapier will be able to access it and use Google Sheets to automate presentations from reports.
Note: Zapier can automate the same process with PowerPoint and Microsoft applications, too. Check out Zapier’s helpful articles about integrating Microsoft and more.
For now, let’s login to Zapier and setup our first Zap.
First Zap: Automate Google Sheets → Google Slides
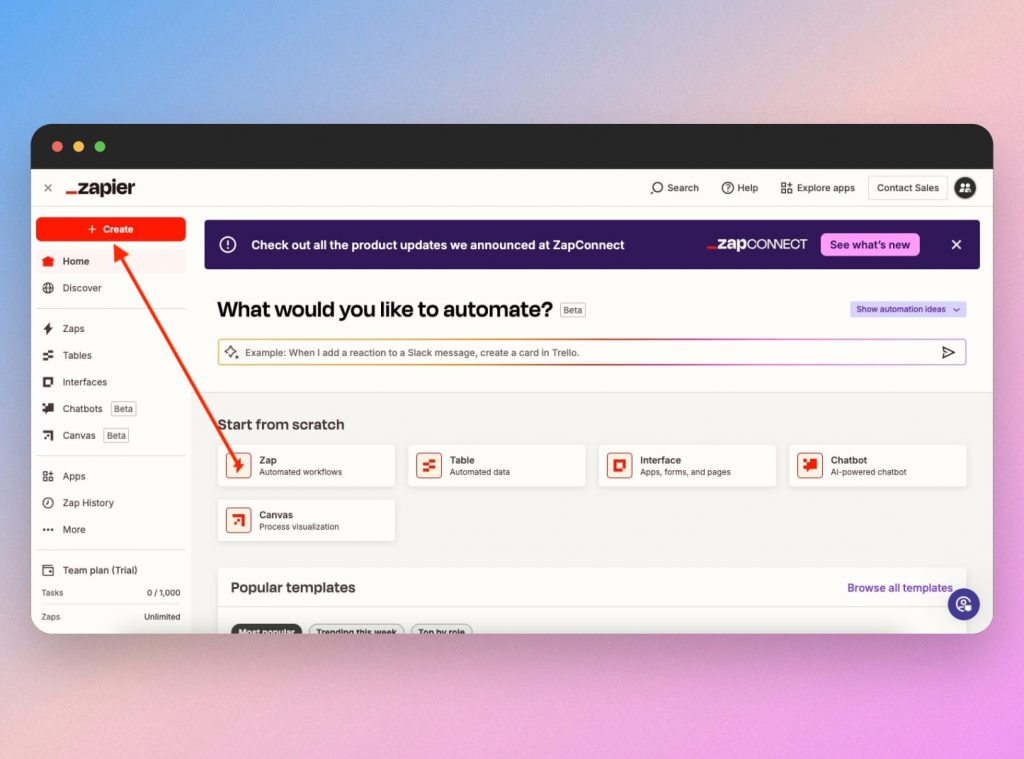
Now that you’ve prepared a Google Slides template for your presentations and signed in to Zapier, click “Create.”
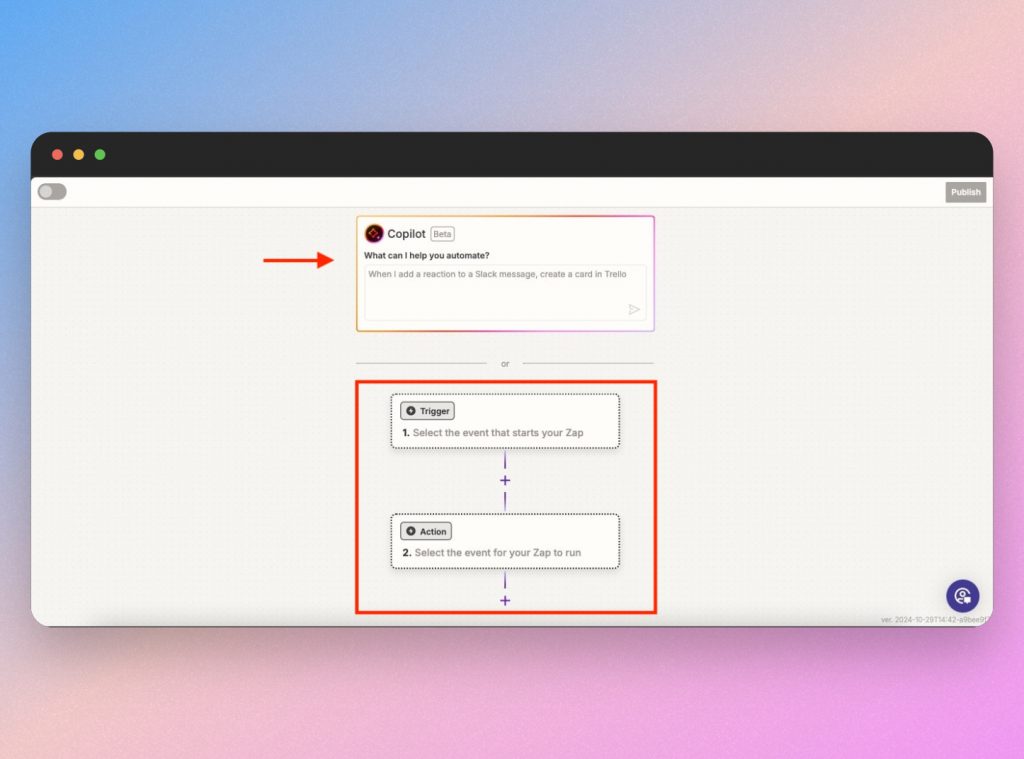
You’ll see a prompt with 2 steps outlined.
- Note: you can chat with Copilot AI for assistance on creating Zaps.
Start with the first step or “trigger event.” This is where we’ll select Google Sheets from the list of options, since we want updates in our spreadsheet to trigger a presentation.
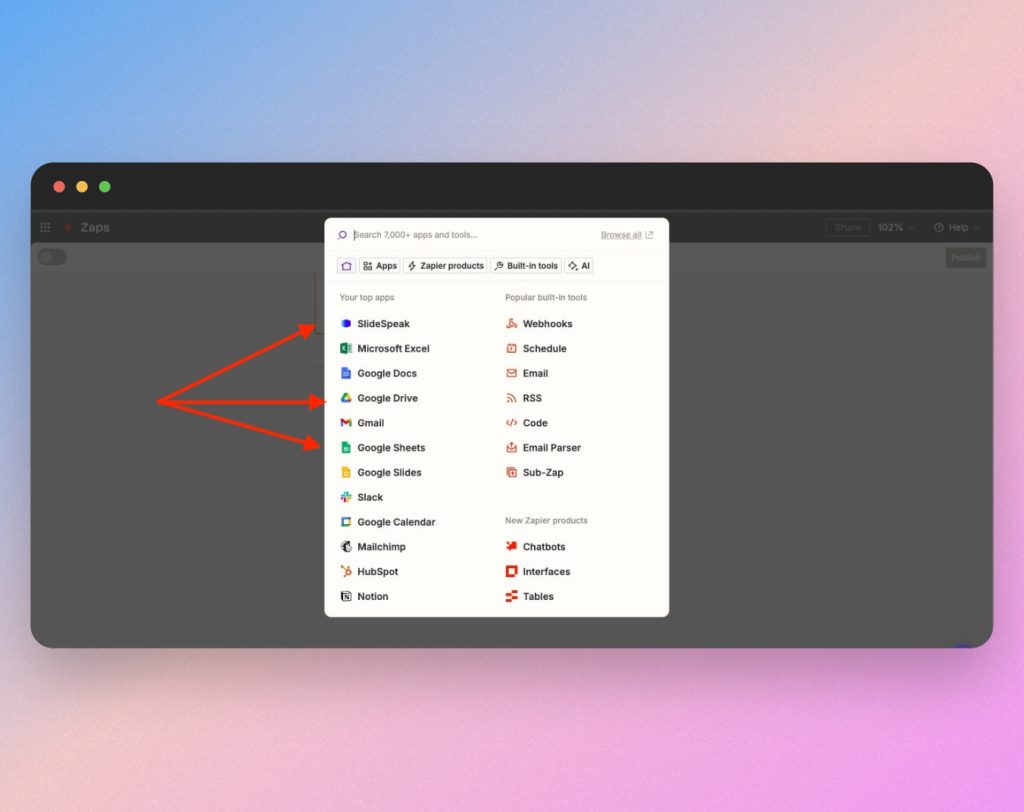
You can link your Google account so Zapier has access to Drive, including Sheets, Slides and Docs. Once connected, Zapier will automatically load your Google Sheets, allowing you to select which sheet will trigger this Zap.
Set up the trigger event by selecting “new or updated row of a spreadsheet” in Google Sheets.
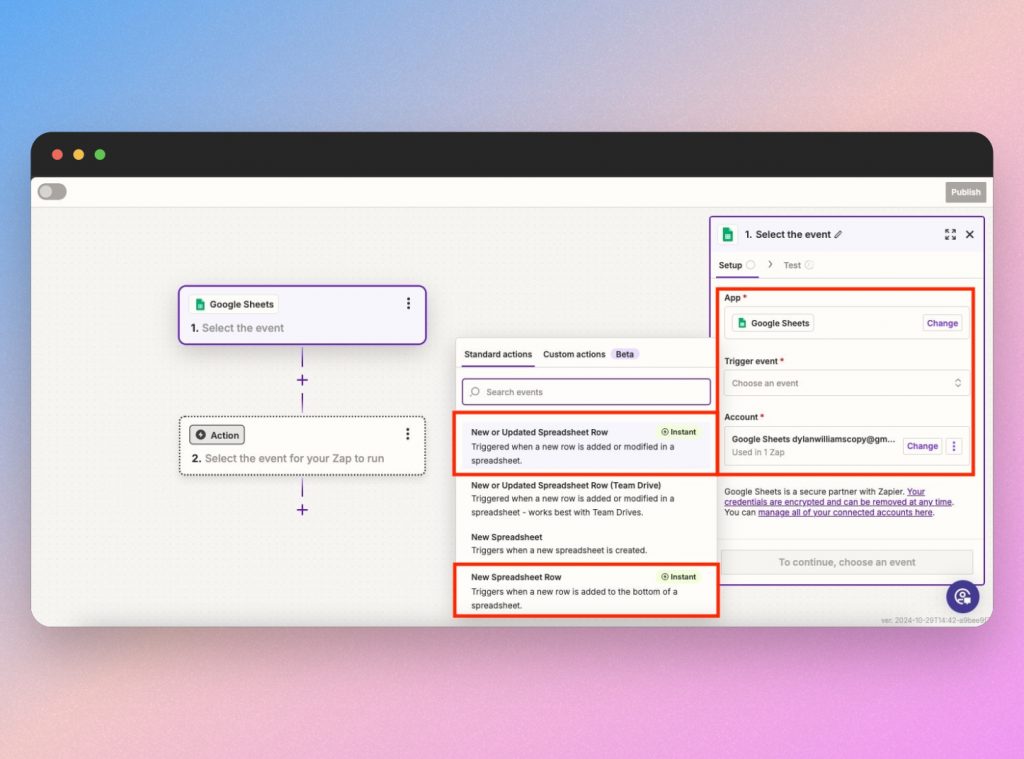
Once you set the trigger and connect your Google account, you’ll be able to choose the report you want to automate.
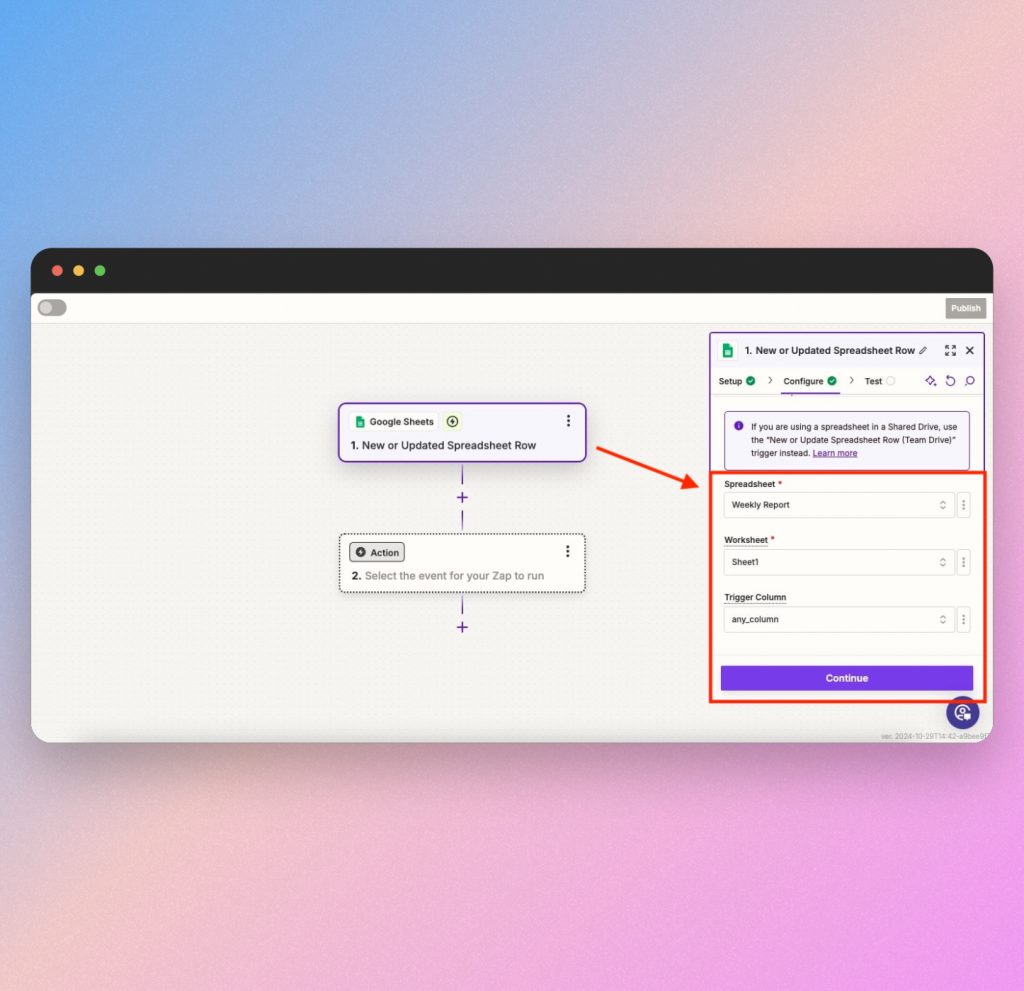
In the next step, configure Google Sheets by locating the file, which in this example is called “Weekly Report.” After choosing the sheet, you can leave the Trigger Column field set to “any_column.”
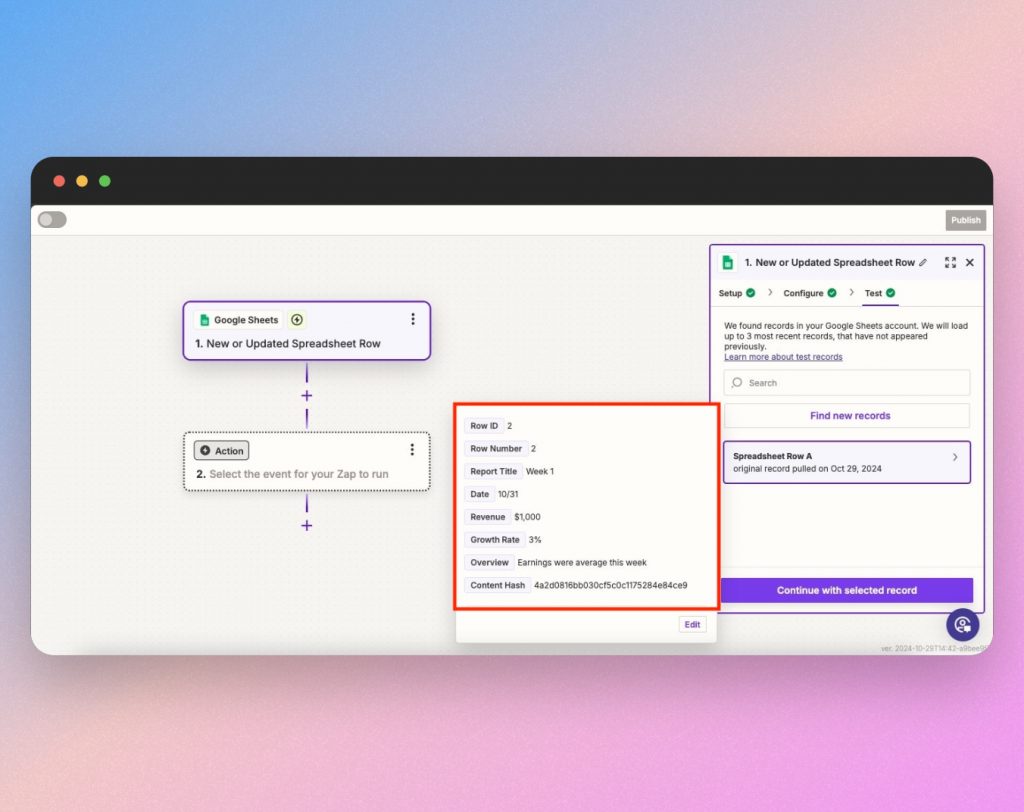
Zapier will then test to make sure it retrieves the right data from Google Sheets.
As you can see, Zapier has located information that matches the spreadsheet shown previously, and will be able to map it to Google Slides.
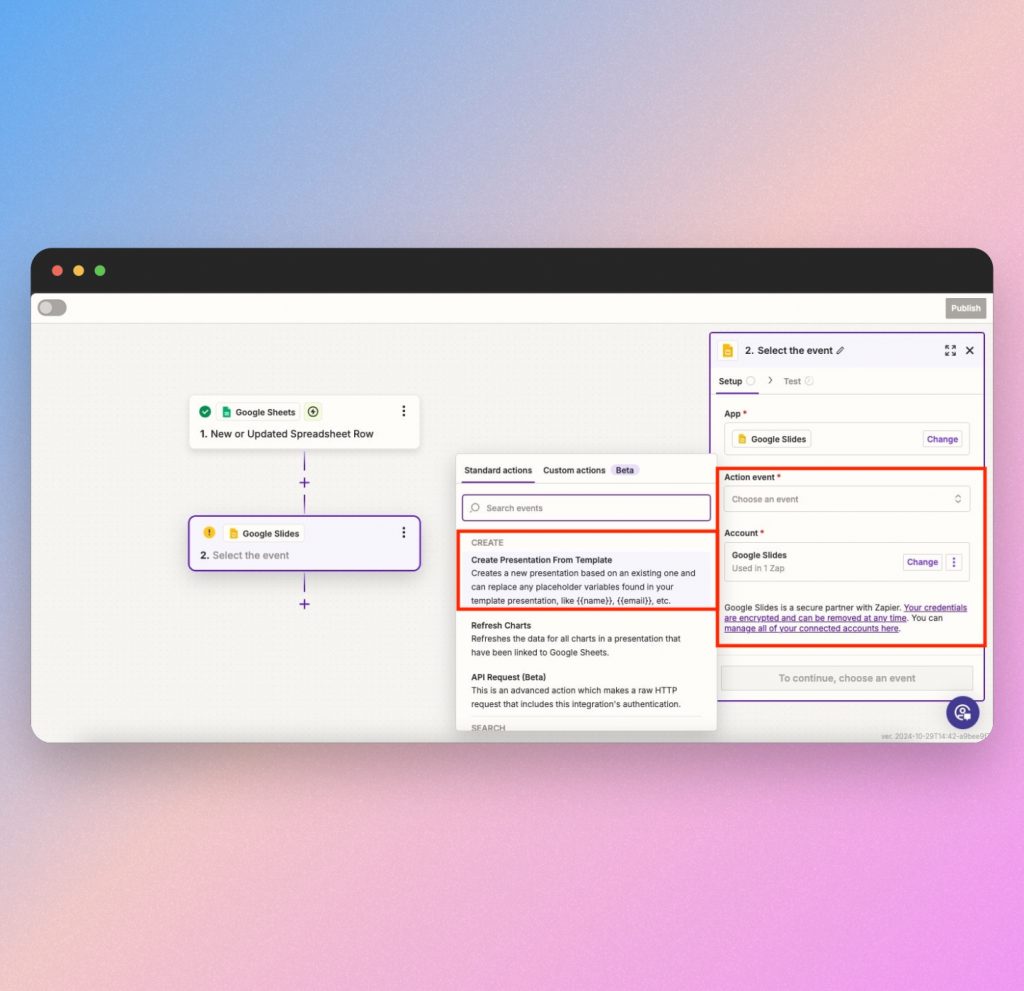
Now that we’ve gotten what we need from Sheets, the next step is to set up the “action” caused by our trigger. Here is where we can select the “conversion” app, which in this example, is Google Slides.
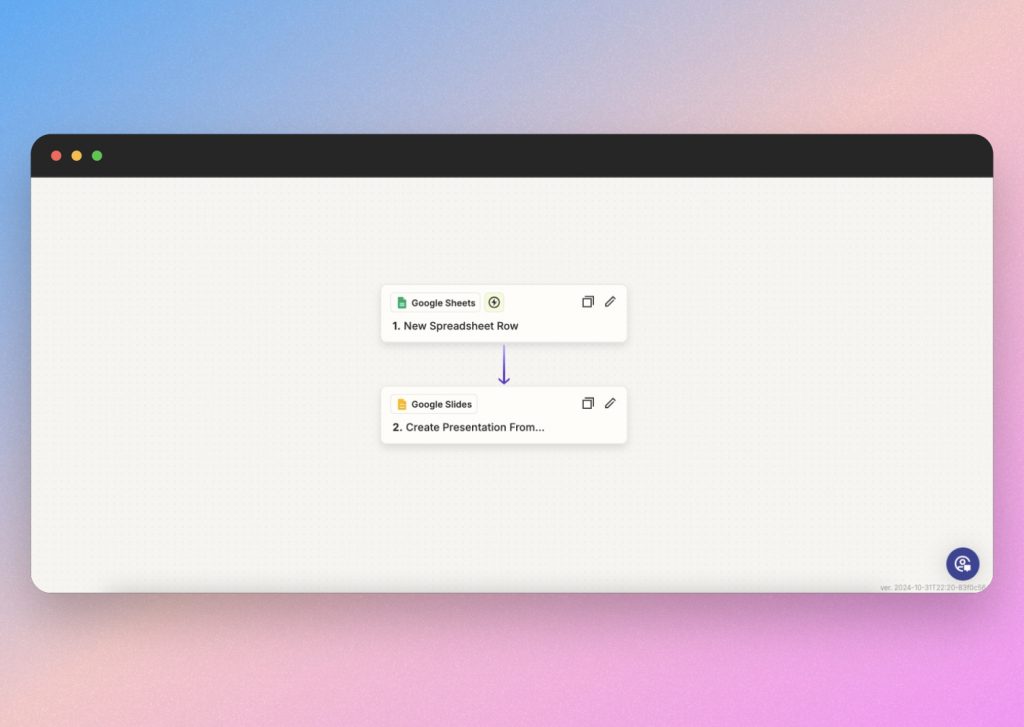
After selecting Google Slides, choose the action “Create Presentation from Template.”
Since we’ve connected our Google account, we can automatically choose files from the list. This is where your presentation template comes in handy. If you’ve built one already, you can choose the template file directly within Zapier and convert the spreadsheet into slides.
Our file is titled “Report Template” so it’s easy to find and we can automate all future presentations with it.
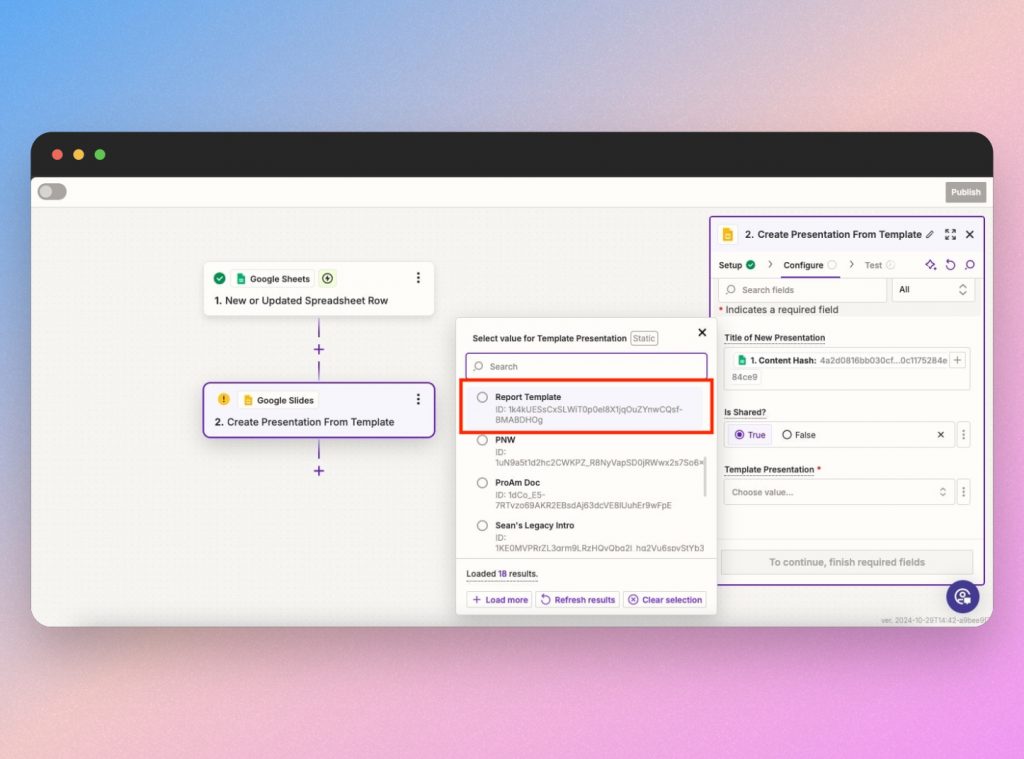
Once you choose the template file, you’ll be able to map information from Sheets to corresponding text boxes in Slides.
- Helpful hint: Always remember to select True for “Is Shared?”
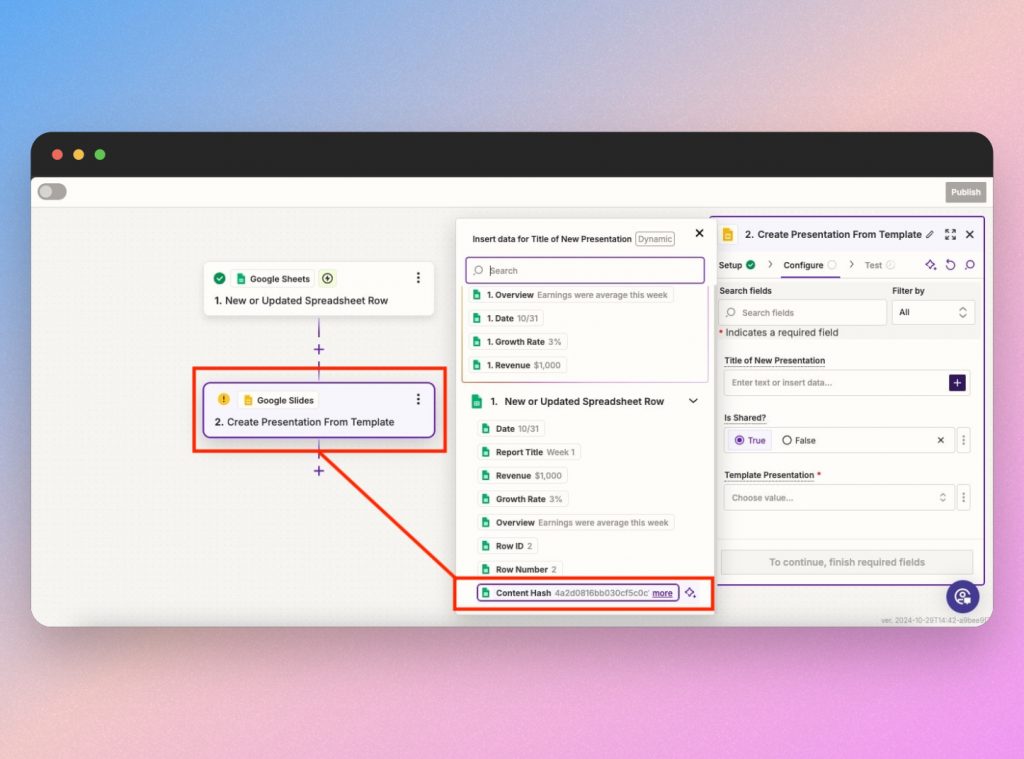
It’s important to map your fields correctly, which means assigning the right cells in the spreadsheet to matching fields in the presentation template. Zapier will automatically populate options for you to choose from, which should be recognizable from your example report and template.
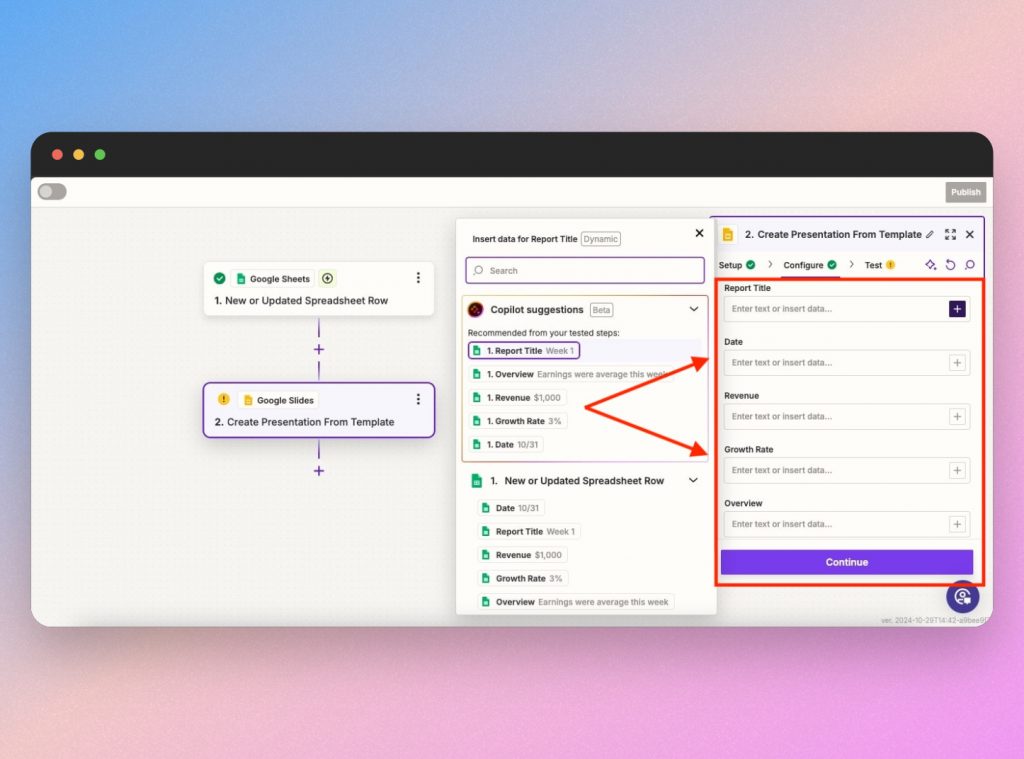
Simply fill in the fields with the matching options to confirm that Zapier will automate a presentation from the right data.
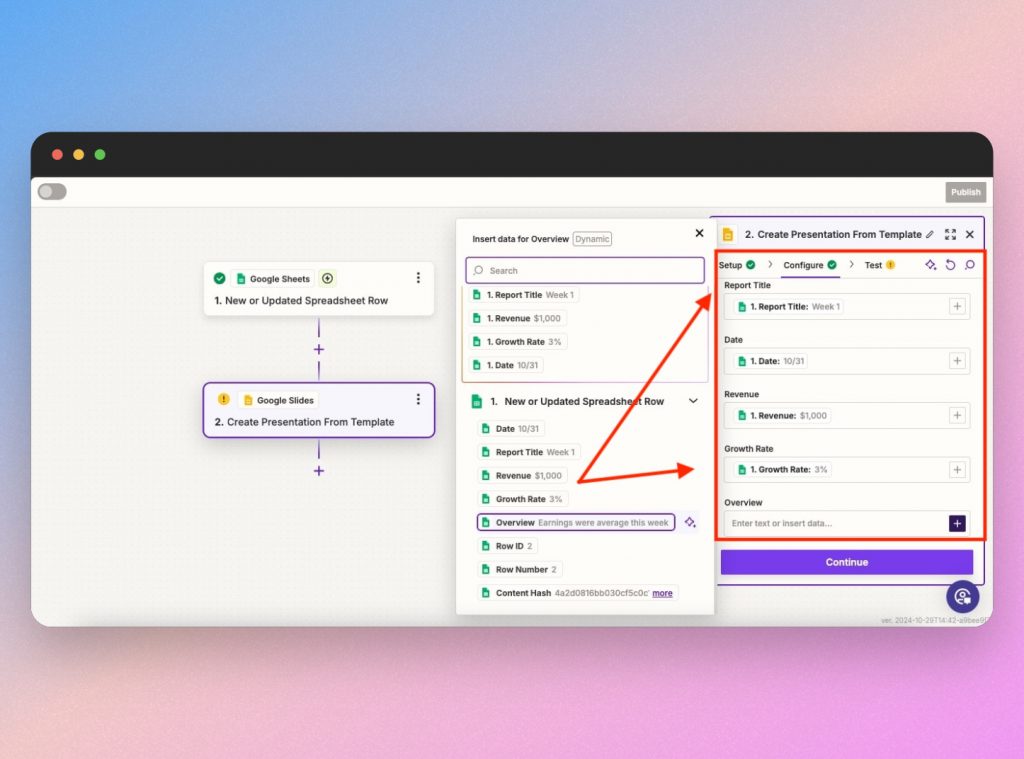
- Helpful hint: If you don’t see fields to automatically map your content, look for the “content hash” option, as that makes each row of your sheet available for mapping to slides.
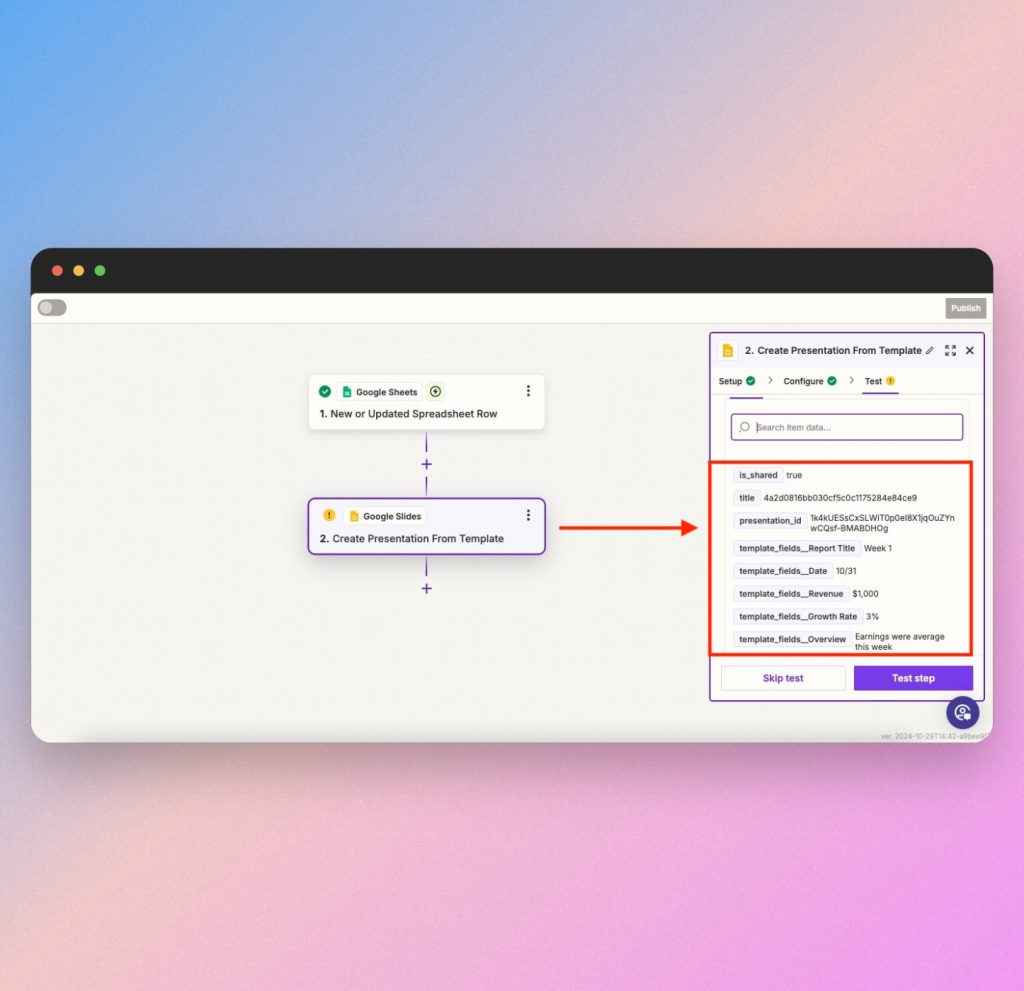
Once again, Zapier will prompt you to test the step. As you can see, it shows a preview of the information that will be used, which matches our example report. This is another helpful opportunity to make sure your workflow is being automated properly.
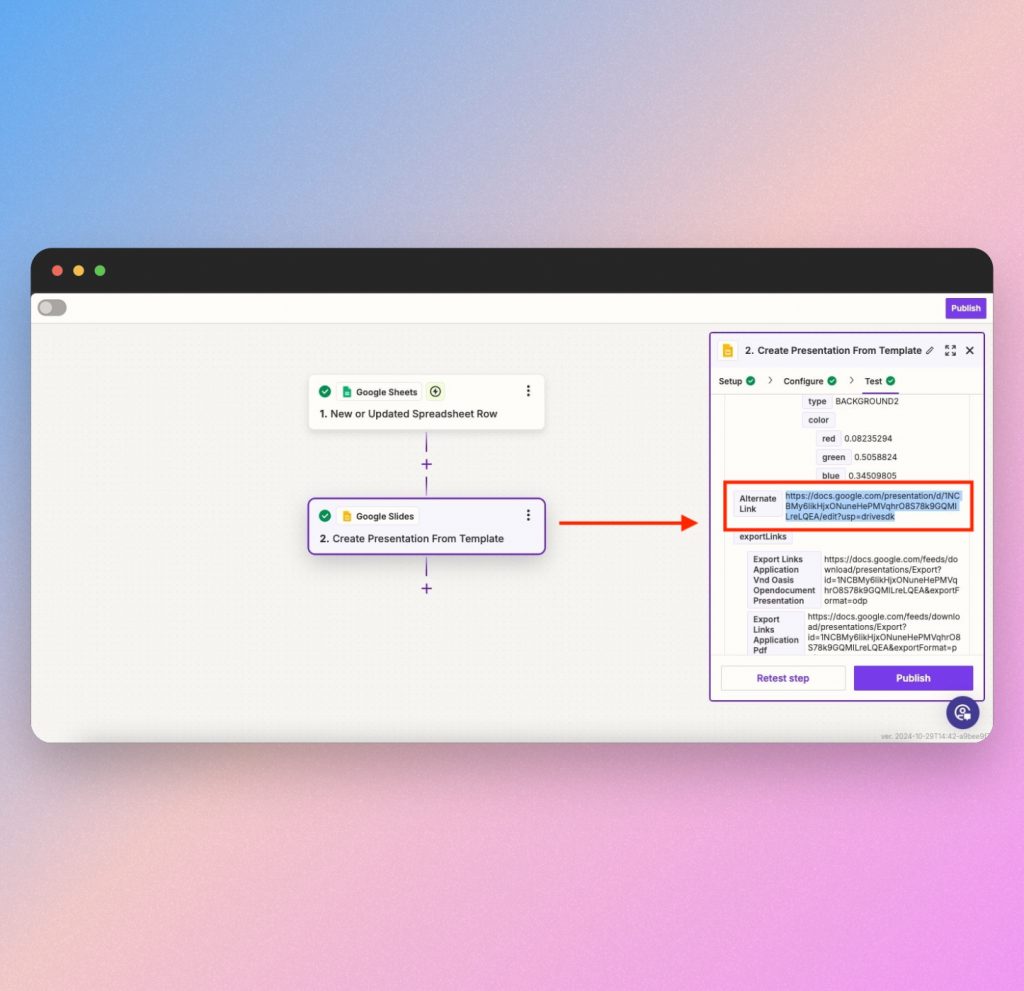
If everything is testing successfully, you can publish the Zap and move on to the second and final Zap needed in this workflow. If you want to preview the presentation before publishing the Zap, scroll down the test window and find “Alternate Link” to copy in your browser. You can also navigate to your Zap history to see what’s been successful.
But for now, we’ll finish automating the next Zap to find a presentation waiting for us in Google Drive – all by simply editing a spreadsheet. There’s only a few steps to go.
Second Zap: Automate Google Slides → Google Drive
To automate a workflow that turns reports into presentations, all that’s left to do is create a second Zap that automatically stores your new presentation to Google Drive.
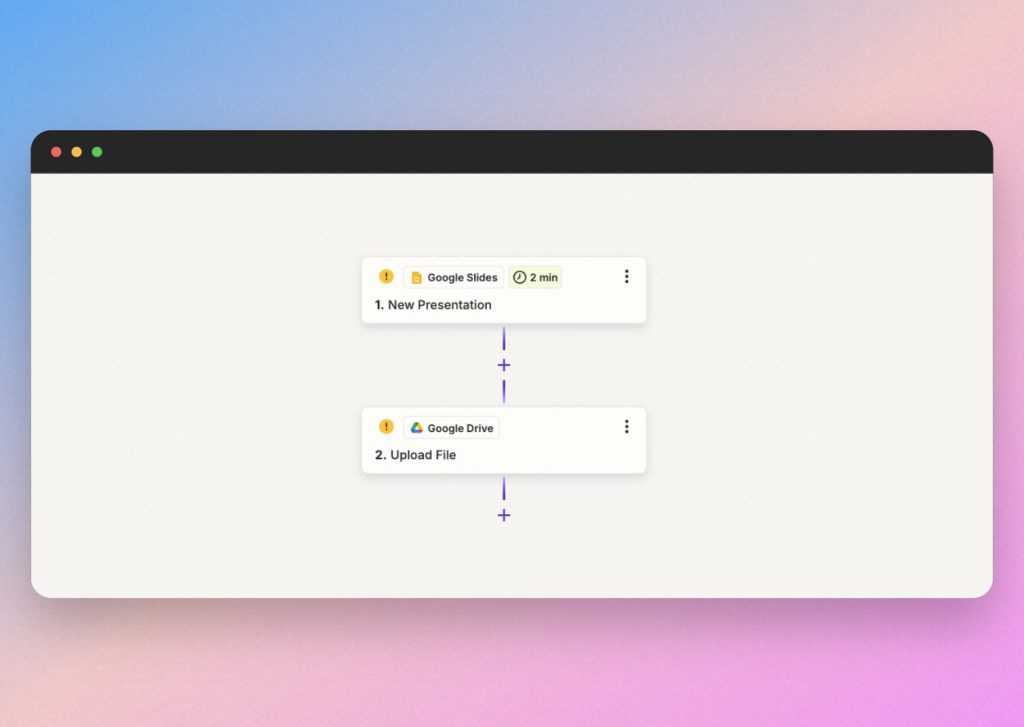
Go back to the option of “Create” and make a new Zap. The starting app here will be Google Slides and the trigger event will be “New presentation.” You may notice this is essentially a chain reaction continuing from the previous Zap.
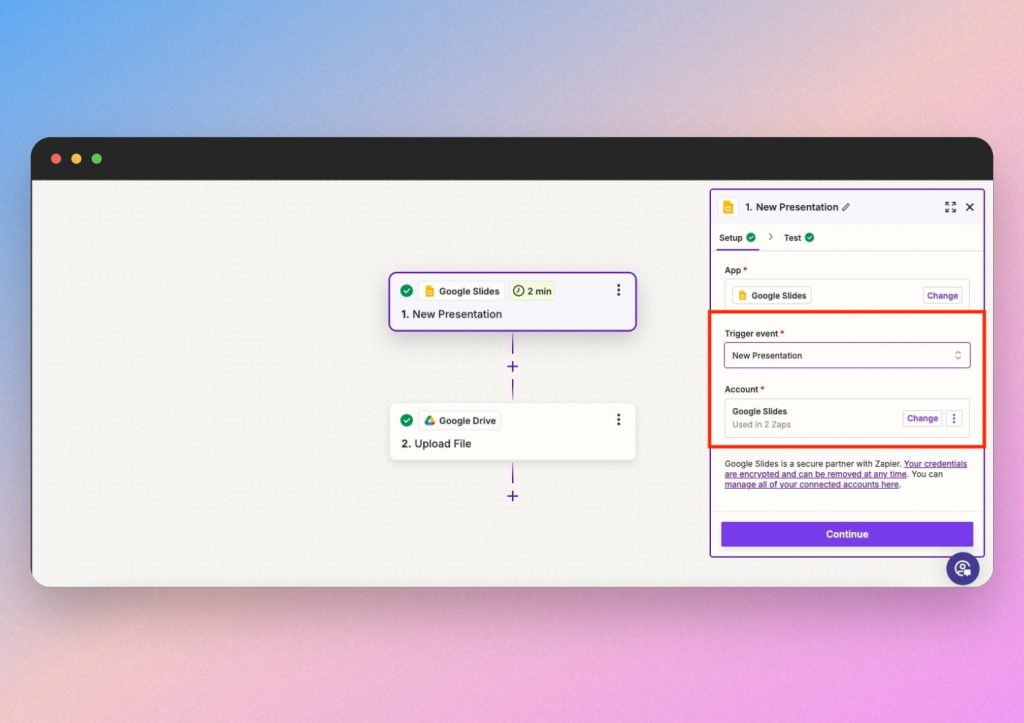
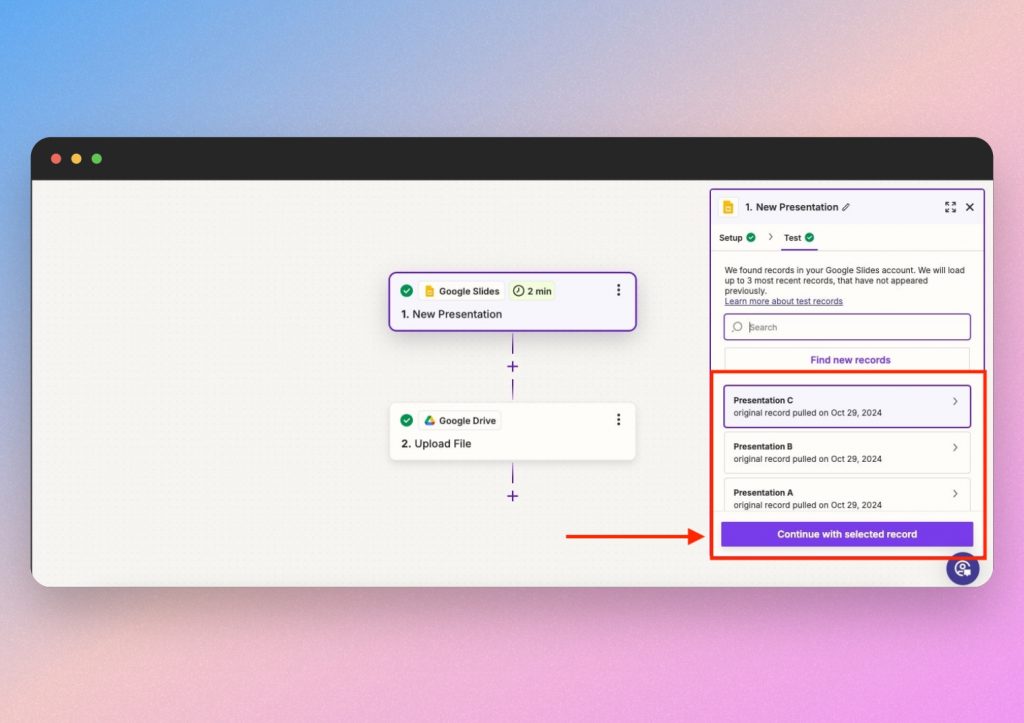
As in the prior steps, double check to make sure your Google account is connected and continue with the selected record. Zapier will keep testing each step along the way.
Now comes the final action in this automation process. Choose the next app or destination, which in this case is Google Drive, and select the action event “Upload File.”
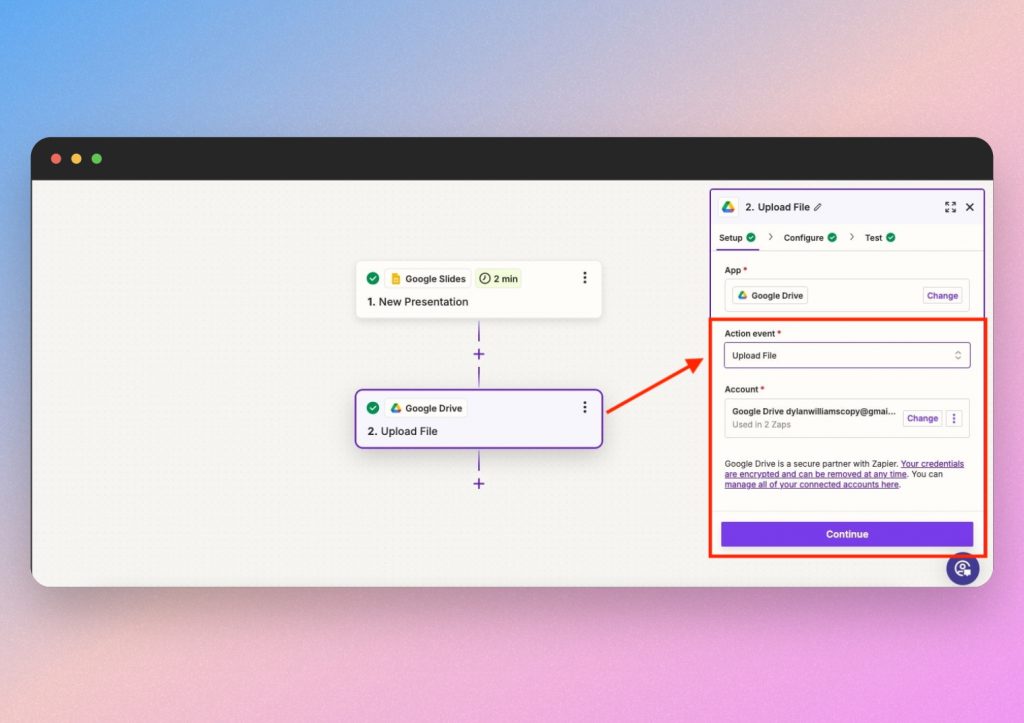
Ensure your account is connected and continue to configure Google Drive by choosing the desired Drive, Folder and File. In this example, we want to store the presentation to My Drive in a folder labeled “Reports” and choose the adequate file from the previous step.
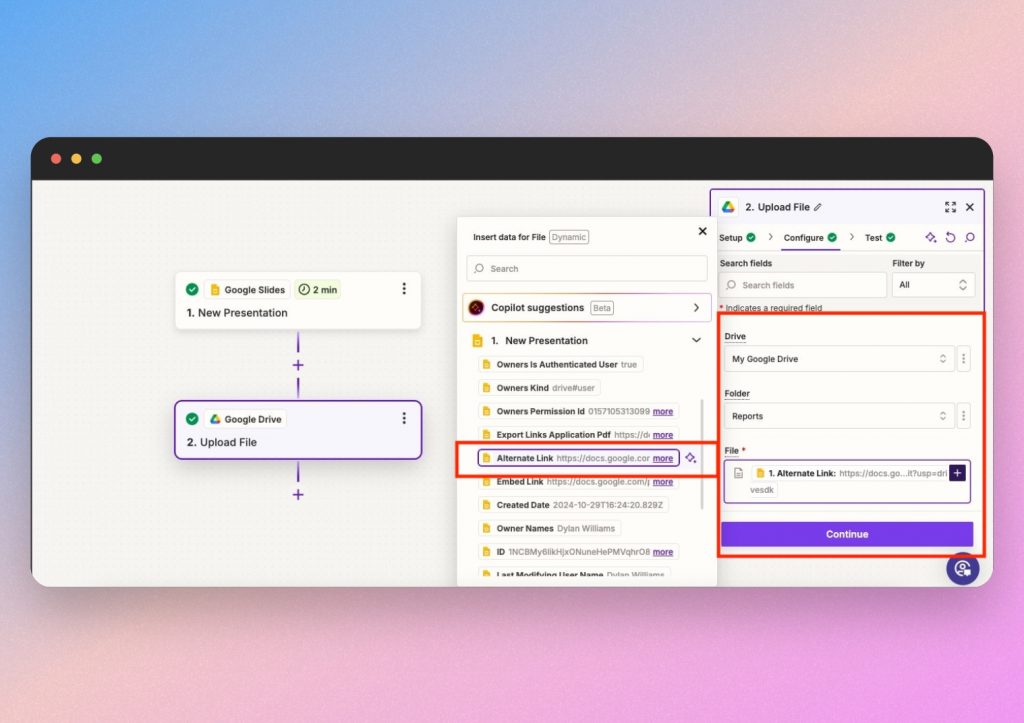
- Helpful hint: explore the field options and URLs presented to verify your material
- If you need to troubleshoot, you can ask Copilot AI for advice directly within Zapier, read Zapier help articles or watch this video on fixing “broken” Zaps.
Next, choose “true” for Convert to Document. You can make up your file name or leave it blank and test. If successful, you will see a newly converted presentation stored in Google Drive.
You’re done creating Zaps!
It may seem like a lot, but now that we’ve set them up, we can put it all to work with ease.
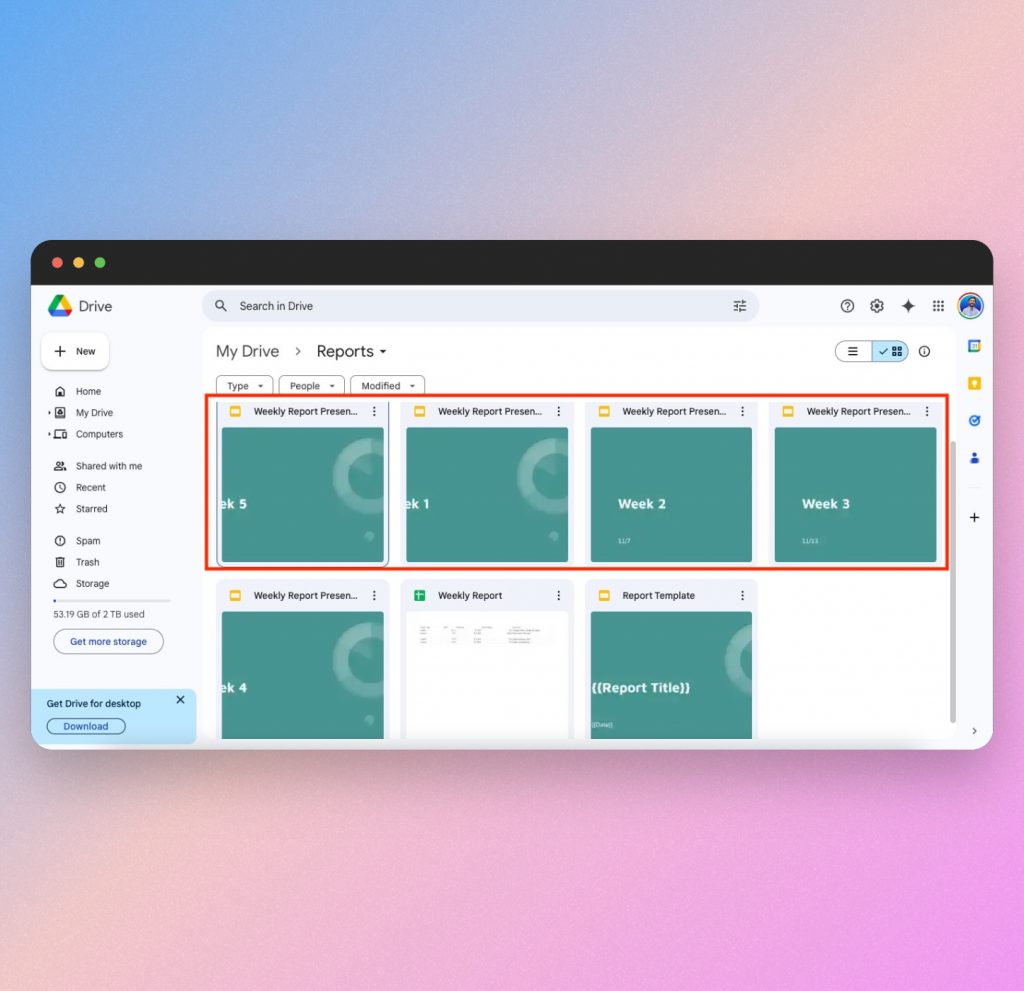
Let’s test it by adding sample information to the Weekly Report in Google Sheets. In a moment, we’ll see how each update in Sheets triggers a new presentation stored in Drive. We’ve tried it a few times by reporting on multiple weeks.
From here on out, we can go straight to Google Drive and find new presentations based on updates in the spreadsheet.
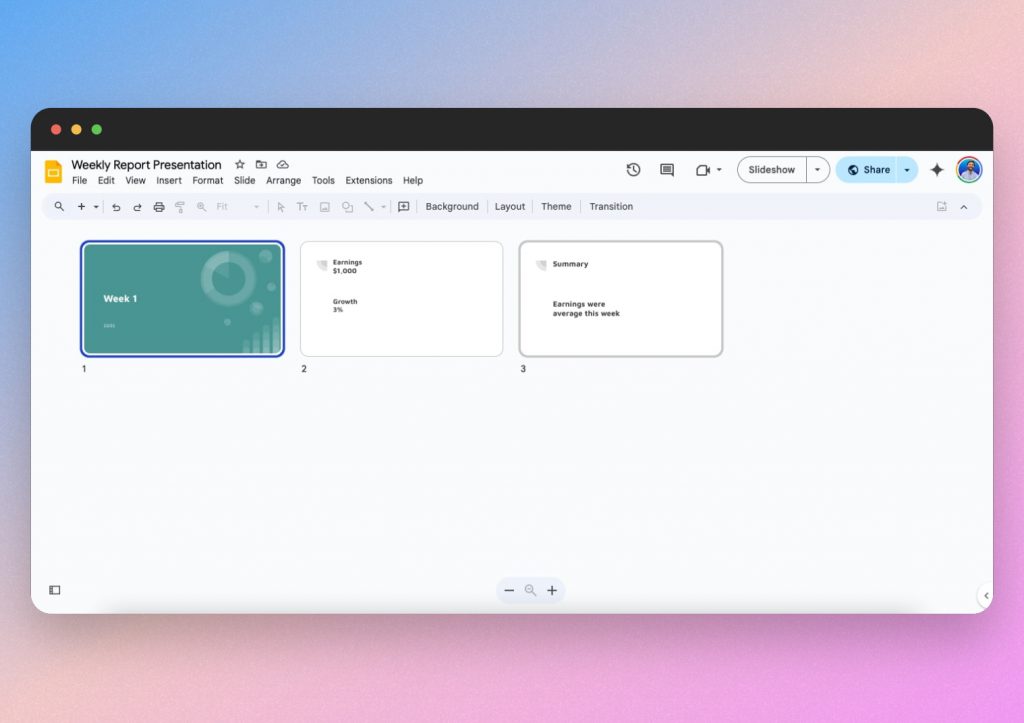
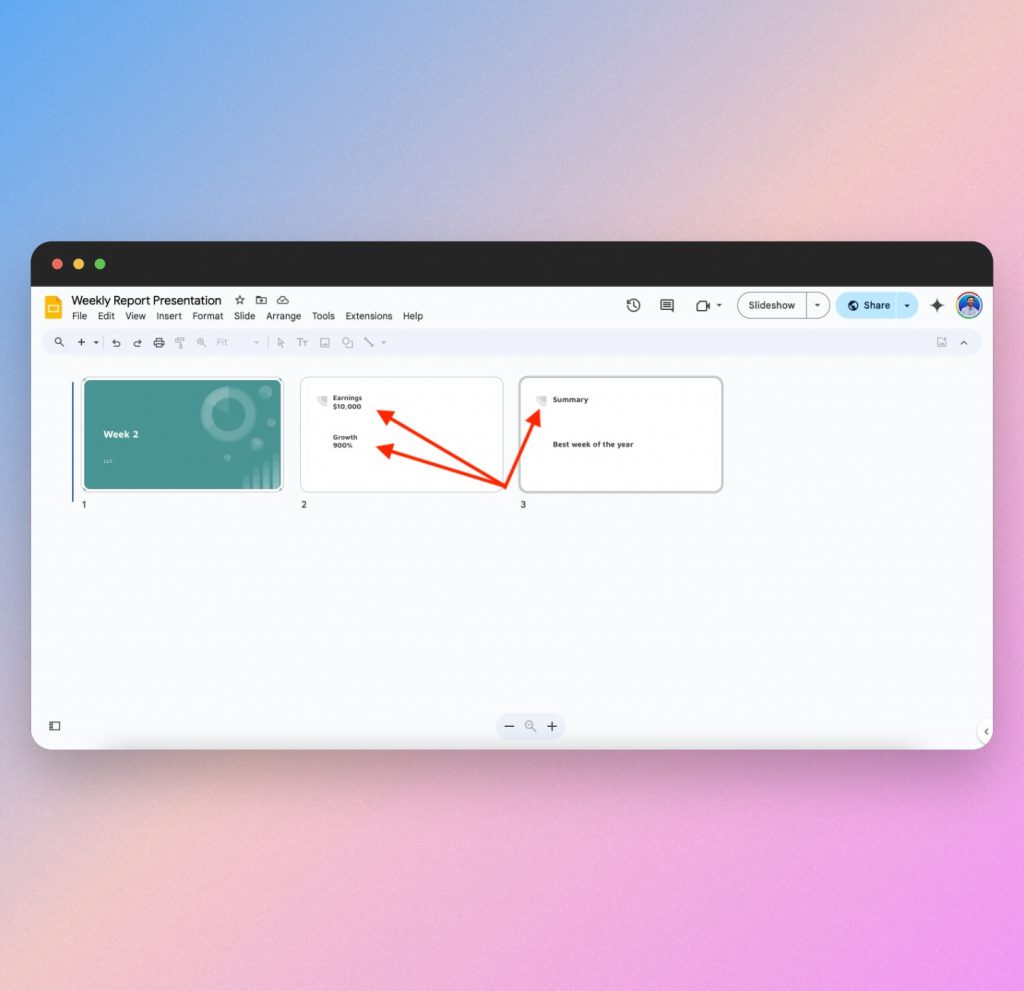
As we open the Week 2 presentation, we’ll see that it matches the information that was updated in the Week 2 report.
Takeaways from the first example
Now that we’ve shown how how to automate reports and presentations with Zapier, you can customize each Zap to your own preference. Feel free to make your presentation templates as detailed or streamlined as desired; integrate any kind of report or proposal from a spreadsheet; automate any kind of presentation.
In fact, we’ll show you an alternative way to automate presentations without needing to use Google Slides or a template.
SlideSpeak can make automating presentations simple, professional and free. Continue reading to see how it works with Zapier.
Example 2: Automate reports from Google Sheets into PowerPoint presentations with SlideSpeak
SlideSpeak is an AI platform that generates professional-quality presentations based on prompts. You can integrate it with Zapier to help automate workflows.
Watch this video to see how easy it is to generate presentations from reports using SlideSpeak.
We’ll basically replicate what we did in the last example by creating 2 Zaps, but use SlideSpeak instead of Google Slides. This option saves you the time of preparing a template. Additionally the SlideSpeak can automate PowerPoint presentations not just Google Slides.
Try SlideSpeak for free here.
First Zap: Automate Google Sheets → SlideSpeak
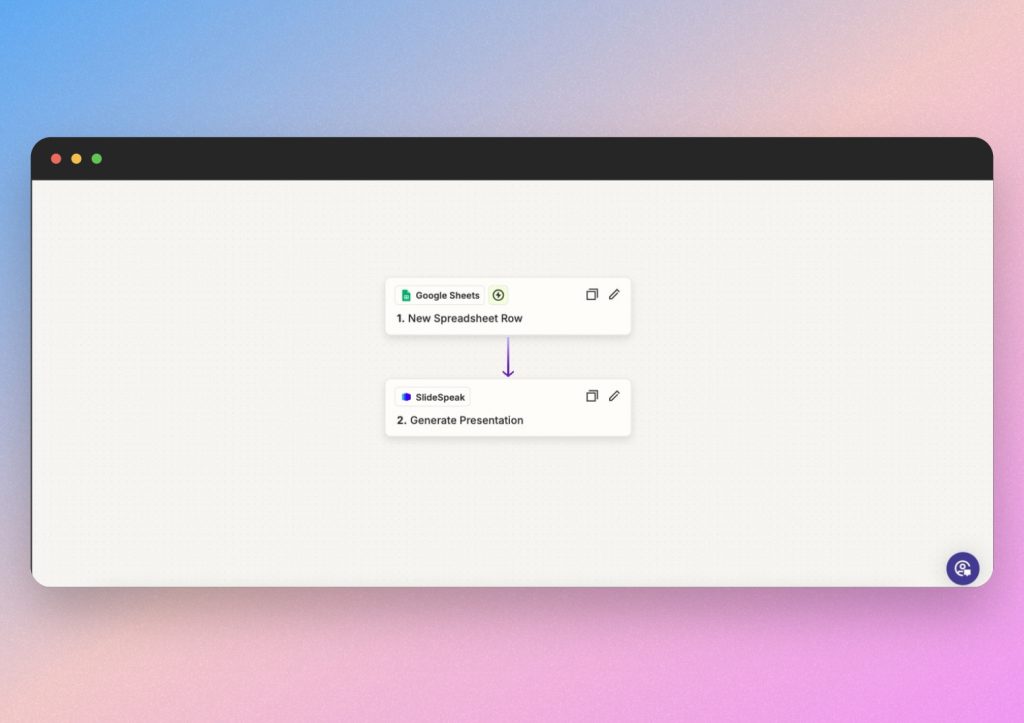
We’ll still start with the trigger event coming from Google Sheets with a “new spreadsheet row.” Connect your account and select the appropriate file and table from Google Sheets as we did before.
Next, we’ll set up the action event which will be “Generate Presentation” in SlideSpeak. You can easily connect your account in the field provided.
Once you’ve connected your SlideSpeak account, you’ll need to “field map” the information from Google Sheets into the SlideSpeak presentation generator. But don’t worry, Zapier has it all integrated for you. You should be able to select fields that correlate to cells or rows in your spreadsheet.
The key here is to type a descriptive prompt in the field box. You don’t have to be overly specific, but it helps to tell the generator what you want the presentation to display. Clarify by typing instructions that match your desired report, then click on corresponding options with the “/” or “+” symbol as pictured below.
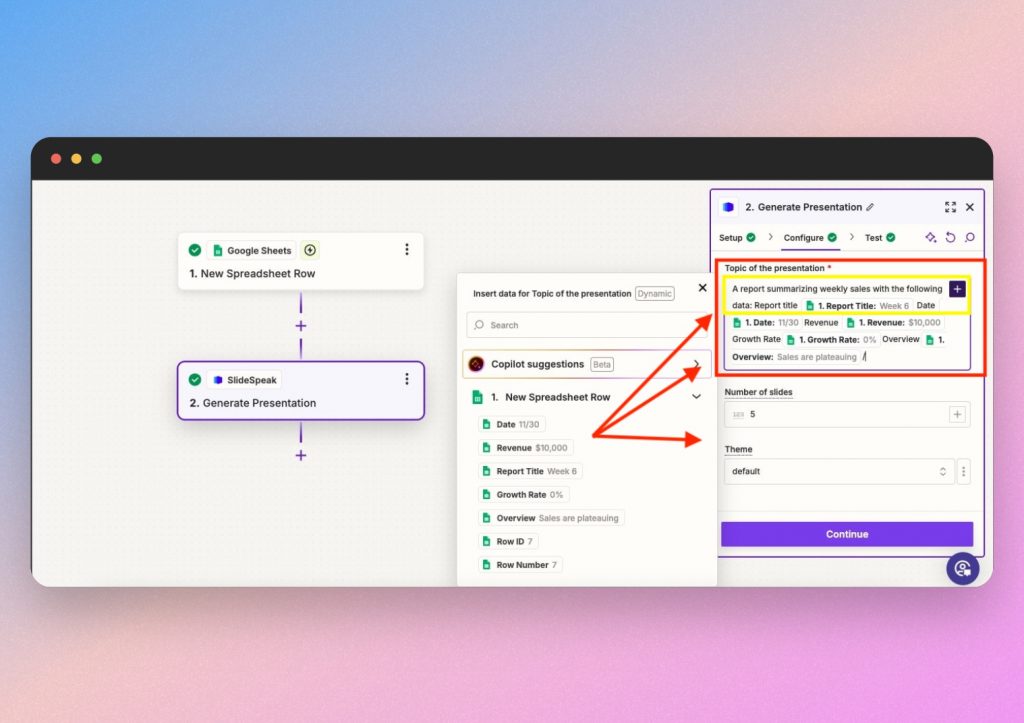
As you can see, we gave basic instructions on how we want our presentations to display. Once you describe your presentation and select the correlating options, you can continue to test.
Second Zap: Automate SlideSpeak → Google Drive (to store your PowerPoint)
Next, we’ll set up our final connection or “Zap.”
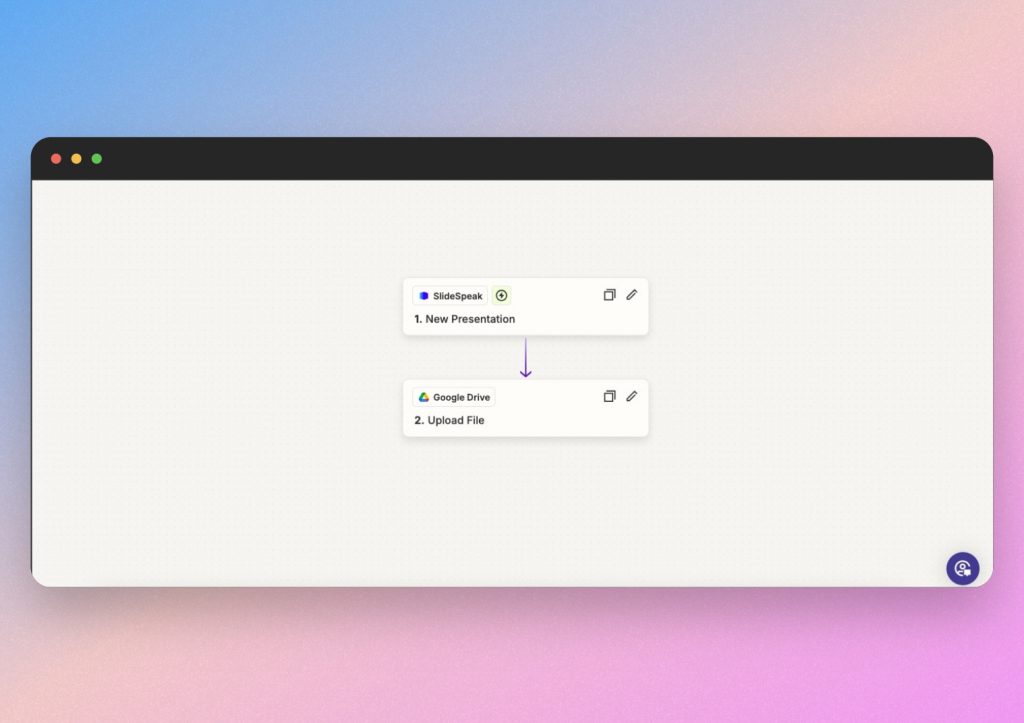
Set up the trigger event in SlideSpeak by selecting “New Presentation” and ensuring your account is connected as before.
Set up the action event in Google Slides by selecting “Upload File” and choosing your Drive, folder, etc.
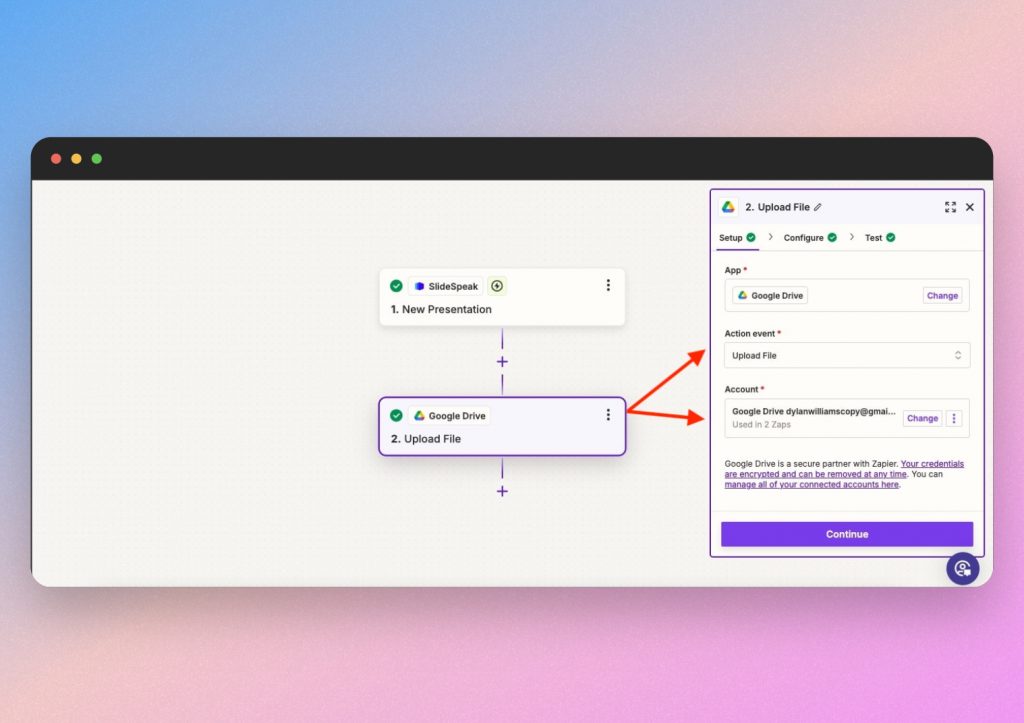
Then choose the adequate presentation URL linked by SlideSpeak. Select “True” for Convert to Document and test before publishing.
You can check your Zap history for success or go ahead and update your desired spreadsheet with a new row. From here, Zapier will automatically tell SlideSpeak to create a PowerPoint file from that spreadsheet and store it in Google Drive. Let’s go check our Google Drive after updating our Weekly Report spreadsheet.
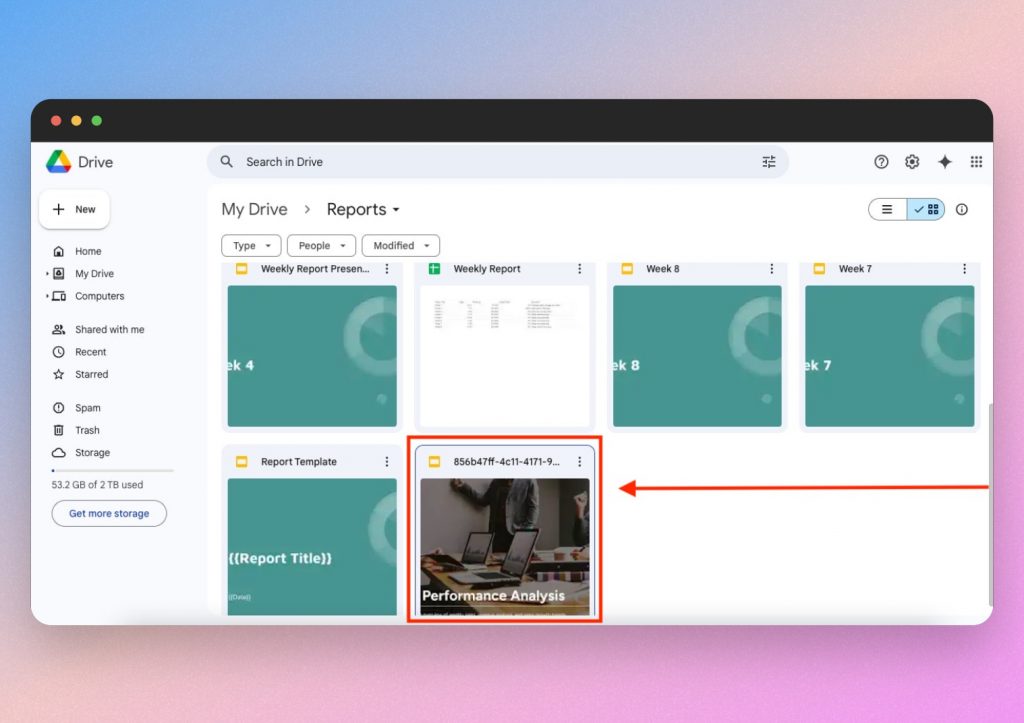
We can see a new presentation saved at the end of our list. The previous files were built from the template in our Google Slides automation, but the last one was built using SlideSpeak. When we open the file, we’ll see a complete presentation showcasing the information from our report. This is the imported PowerPoint file from SlideSpeak in the Google Slides preview.
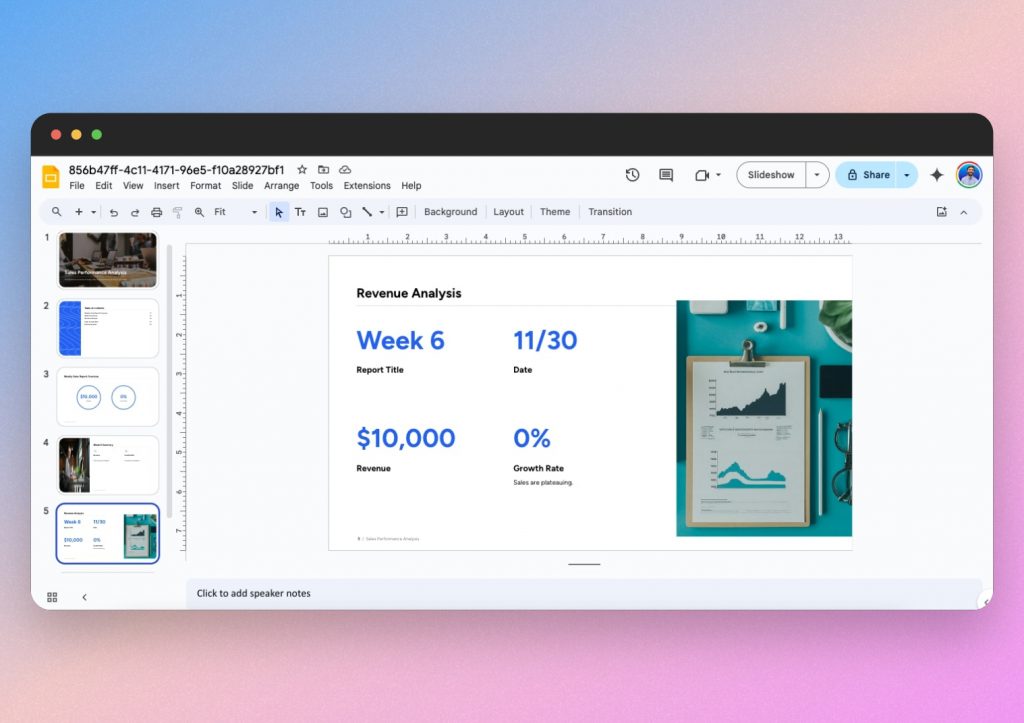
You – or anyone on your team with access – can simply update a spreadsheet and then receive a presentation automatically.
It’s worth noting as we did in the previous example, that each Zap or workflow can be customized to your preference. We’ve only shown a couple examples using Google and SlideSpeak, but Zapier can automate workflows with all of the most recognizable apps.
You can also save the SlideSpeak presentation as a PPTX file if you work in Microsoft PowerPoint, and the workflows are relatively the same.
Conclusion
Zapier can automate any workflow, especially with the help of AI. If you want to turn reports from spreadsheets into presentations, you can do so by integrating Google Slides, SlideSpeak or PowerPoint with Zapier. Some of the coolest features include the fact that Zapier is an easy-to-access website, it offers a free version and it’s logical to use.
Overall, Zapier is ideal for teams, businesses and individuals. There’s a plan for all kinds of users and it doesn’t require installation or download. Simply sign up, choose the apps or platforms you want to connect and refer back to this article for helpful hints on automating reports as presentations.
FAQs
Q: Is Zapier free to automate reports?
A: Yes, there is a free plan for Zapier that has limited options. It’s still super effective for personal use, but if you want to upgrade, the Professional Plan starts at $19.99/month while the Team Plan is $69/month.
Q: Can Zapier automate reports for me?
A: Yes, by using Zaps from SlideSpeak and Google Sheets, Zapier can receive your connected reports and automatically publish them as presentations, documents and more.
Q: How do I install Zapier?
A: Since Zapier is website, you don’t need to download or install anything. Simply go to the website and start connecting your apps.
Q: Can I use Zapier with Microsoft PowerPoint?
A: Microsoft does not offer a direct Zapier PowerPoint integration. But you’re able to create PowerPoint files with SlideSpeak and save it to Google Drive or other providers. You can also check out all other Office365 integrations here: https://zapier.com/apps/office-365/integrations
